Concept to Launch in 6 Weeks: Private Label Lashes (X-Week)
A realistic, repeatable timeline for launching private label lashes—without skipping QC, branding, or compliance basics.
Introduction
“Can we launch in X weeks?” is one of the first questions we hear from new lash brands.
Yes—often. A 4–6 week launch is realistic when you lock specs early and use stock packaging + custom labels/sleeves. If you require fully custom printed boxes, more SKUs, or slow approvals, plan 7–10+ weeks.
This guide shows: the exact week-by-week path we used to go from concept to launch in 6 weeks, plus the approval rules, QC checkpoints, and packaging decisions that prevent timeline slip.
Paste-ready box (short, high-converting)
Editorial transparency (how to read this case study)
What’s real vs anonymized: Timeline steps and deliverables reflect an actual 6-week launch; names, supplier identity, and sensitive commercial details are anonymized.
What’s generalized: “Common delays/mistakes” sections summarize patterns we repeatedly see across launches.
Commercial relationship: We may offer services related to private label lashes; recommendations aim to be practical regardless of who you work with.
Not legal/medical advice: Compliance and sensitivity guidance is informational; consult qualified professionals for legal/medical decisions.
Last updated: [Month Day, Year] (we update when labeling rules/platform requirements or best practices change).
Tip: You can swap “6” for your own “X.” The same structure works for 4–10 weeks—your biggest variables are custom packaging, SKU count, and approval speed.
Slow approvals (subjective feedback instead of “go/no-go” criteria)
The quality shortcut that backfires
Skipping curl/length consistency checks across multiple trays (a single perfect sample ≠ stable batch)
What “launch-ready” means (deliverables)
Product photos (hero + side profile + band close-up)
SKU naming + barcode/SKU system
Claims-safe listing copy
Shipping cartons + packing list format
Reorder trigger plan (before you sell out)
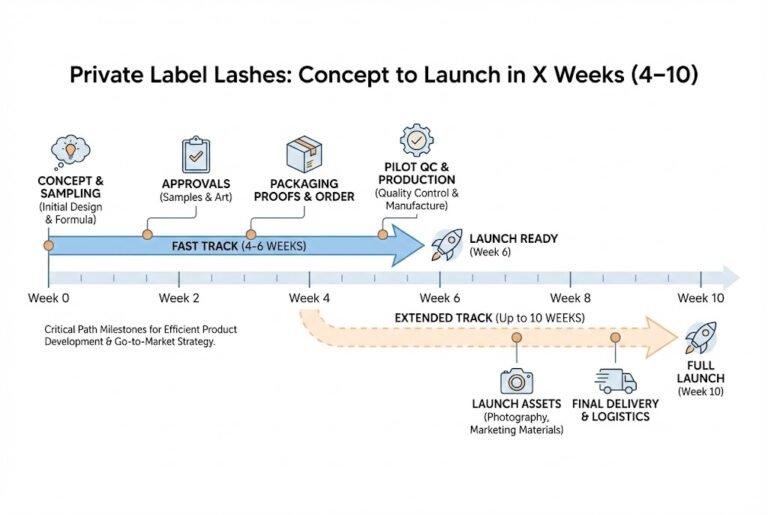
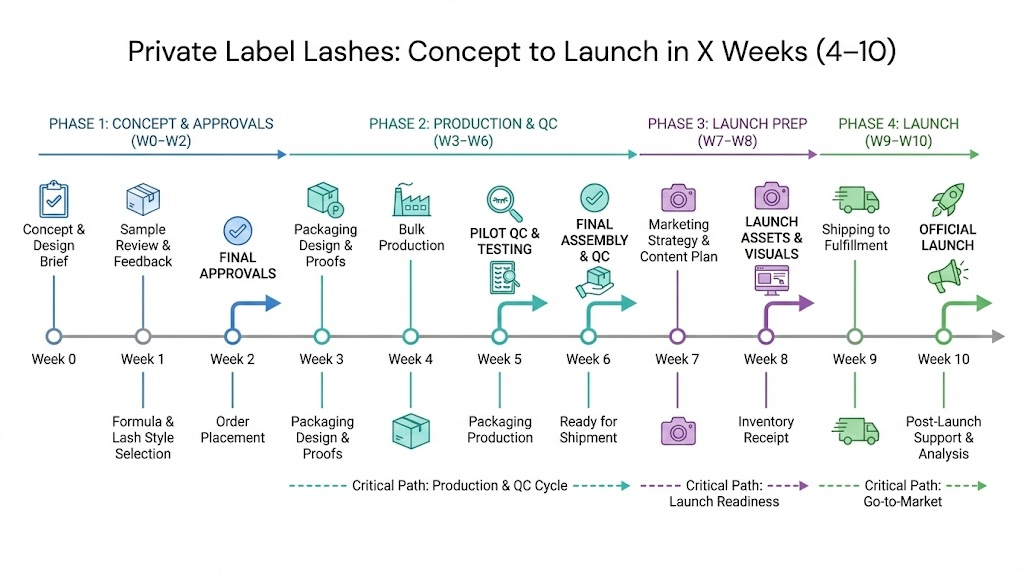
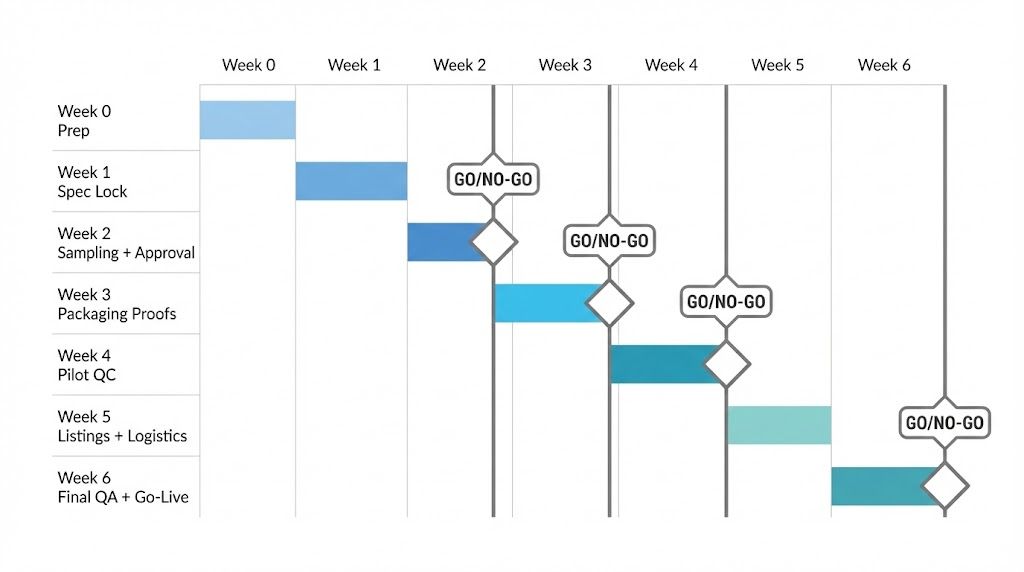
Timeline at a glance (X-week template)
Week
What you must decide
What you produce
Common delay
Go / No-Go criteria
Week 0 (Prep)
SKUs, hero SKU, spec boundaries, packaging route
Locked inputs
“Let’s brainstorm more”
Decisions finalized in writing
Week 1
Style references → measurable specs
Spec-locked sample brief
Spec creep
Curl/diameter/length map/band defined
Week 2
Approval rules (tolerances)
Sample round + pass/fail
Subjective feedback loops
Curl/length tolerance + band integrity pass
Week 3
Packaging dieline + barcode + copy
Packaging proof(s)
Proof cycles
Print-ready dieline + barcode verified
Week 4
Pilot QC plan
Pilot batch + QC audit
Batch surprises
Random tray checks pass
Week 5
Listings, photos, logistics
Launch assets + carton plan
“Not glamorous” tasks ignored
Listing + photos + shipping docs complete
Week 6
Final QA + go-live plan
Finished goods + pre-launch QA
Last-minute mismatch errors
SKU↔barcode↔tray code match; transit checks pass
Citable takeaway: The critical path is approvals → packaging proofs → pilot QC → launch assets, not “production.”
The Project Snapshot (What We Were Building)
We’ll call the brand Luna Studio Lashes (anonymized). Their goal was a clean, modern lash line for everyday wear and light glam—priced mid-tier, sold via Shopify and a small salon network.
Target launch scope
3 SKUs (everyday, wispy, soft glam)
One core fiber look (faux-mink style finish)
Two lengths per SKU (e.g., 10–12 mm and 12–14 mm maps)
Packaging: branded lash box + outer mailer carton
MOQ: kept low to reduce risk and test sell-through
Actionable takeaway: If you want speed, reduce decisions that require physical samples (custom finishes, special foils, complex inserts) until after launch.
Week 1: Concept, Sampling, and Spec Lock (Decision Sprint)
Goal of Week 1: turn “a vibe” (natural, wispy, doll-eye) into measurable specs your factory can produce consistently—so sampling doesn’t loop and your launch timeline stays intact.
Week 1 deliverables (what you should have by Friday)
A Style Board (8 references) + notes on what you’re matching
A SKU naming system that matches photos and avoids customer confusion
A change-control rule: what can still change in Week 2 vs what’s locked
Why this matters for speed and trust: Cosmetic GMP frameworks emphasize defined specifications + controlled processes to protect quality and reduce variability.
Step 1) Build a Style Board (8 references that “mean something”)
Pick references that represent the actual looks you want to sell, not aspirational images you can’t replicate.
Include (minimum):
2 “everyday/natural”
2 “wispy”
2 “soft glam”
2 “shape references” (doll-eye vs cat-eye)
For each reference, write one sentence:
“This is wispy because ____ (spacing + taper + density).”
“This is natural because ____ (shorter length map + softer curl + lower density).”
This is how you prevent subjective feedback later (“make it more natural”) from turning into endless resamples.
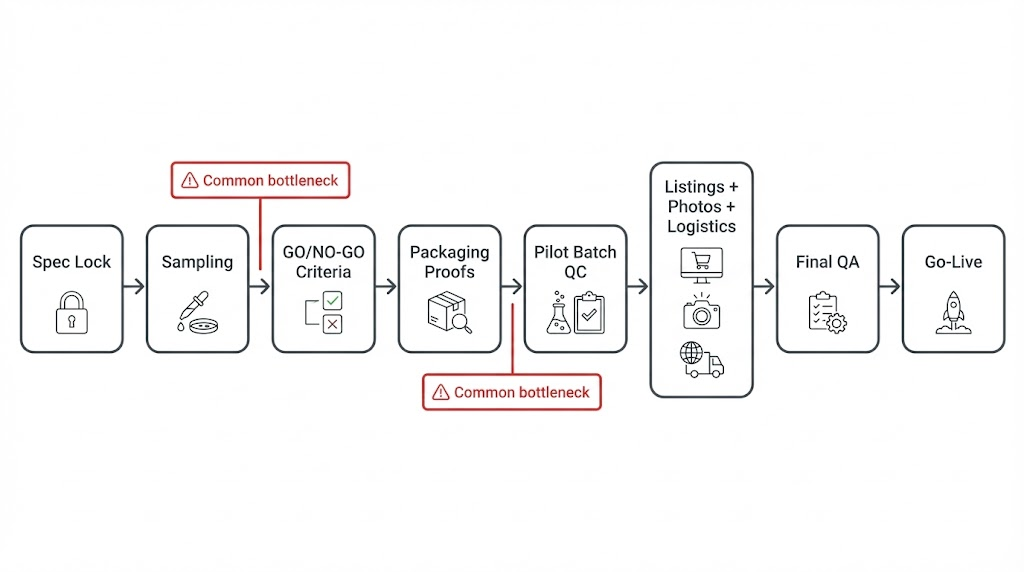
Step 2) Translate “vibes” into measurable specs (the Spec Lock Sheet)
A fast private label lash launch is less about “finding the perfect lash” and more about locking measurable specs early—so the factory can produce repeatable samples and batches.
Spec Lock Sheet (copy/paste template)
Record these as exact values (or allowed ranges) before samples are made:
A) Fiber / finish
Fiber polymer: typically PBT (a thermoplastic polyester commonly used for engineered fibers).
Finish target: matte / soft sheen / glossy
Color target: jet black / soft black / brown-black (if applicable)
Why PBT gets used: it’s a well-characterized polyester/engineering plastic that can be processed into consistent fibers. (If you want a “curl memory” claim internally, keep it as an internal performance goal unless you can substantiate it for consumers.)
B) Curl
Curl family: B / C / CC / D (choose 1–2 only)
Curl priority: comfort vs drama (your brand positioning)
C) Diameter
Choose from your factory’s standard diameter options
State the intent: “comfort-first” vs “bold density”
D) Length map
List the exact length map(s) per SKU (e.g., 10–12mm map, 12–14mm map)
Specify shape: doll-eye / cat-eye / rounded
E) Band
Band type: clear / black / cotton thread / etc. (factory standard naming)
Band requirement: “clean edges, no visible residue, uniform thickness”
F) Tray presentation
Tray fit requirement: lash should sit flat; minimal lift during transport
Peel test expectation: should release cleanly and re-seat without deforming
Step 3) Lock a SKU naming system that matches photos
This is a quiet CTR + conversion lever: customers click and buy when the product name maps cleanly to what they see.
Simple naming format (works for Shopify + ads): [Collection] – [Look] – [Curl] – [Map] Example: Luna Core – Wispy – CC – 10–12
Rules:
If the map changes, the SKU name changes.
If the curl changes, the SKU name changes.
Avoid “creative” names until after your naming is operationally reliable.
Factory-side insight #1: Spec creep is the silent timeline killer
When brands say “natural”, they may mean:
thinner diameter,
shorter length map,
lower density,
softer curl,
more taper,
less shine.
So we treat “natural” as a definition exercise and lock specs before sampling. This aligns with GMP thinking: quality improves when you define what you’re making and control the inputs/processes rather than relying on subjective inspection alone.
Goal of Week 2: turn “vibes” into objective acceptance criteria so sampling doesn’t loop.
What you should have before you review samples
Spec sheet (curl, length map, band style, fiber finish target)
Reference board (your 6–10 photo references)
Approval scorecard (the same questions every time)
This “same checklist every time” approach mirrors how formal inspection systems keep outcomes consistent across lots. For brands that want a standards-based model, acceptance sampling frameworks commonly use an AQL (Acceptance Quality Limit) to define acceptable defect rates and sampling rules.
1) The sampling plan (simple + repeatable)
Don’t judge a whole run from the single “best” tray.
Do this instead (low-MOQ friendly):
Pull multiple trays across the set (not adjacent trays from the same carton).
Include at least:
one tray from early packing,
one mid-pack,
one late-pack (or from different cartons).
Take quick photo evidence (top view + side profile + band close-up) per tray.
Why: ISO cosmetic GMP guidance is built around controlling and checking product quality through production, storage, and shipment—not only “one perfect sample.”
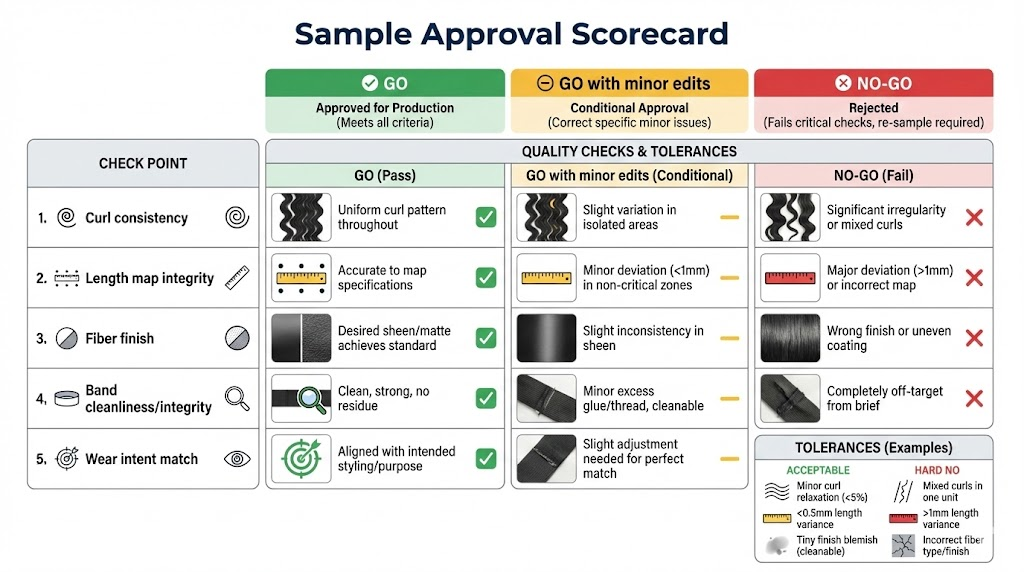
2) Approval rules (your “go/no-go” scorecard)
Use three decision outcomes so feedback is actionable:
Decision outcomes
GO: Meets spec and reference intent → proceed to pilot/production
GO with minor edits: Small change allowed without changing tooling or restarting sampling (ex: slightly reduce shine)
NO-GO / Re-sample: Anything that affects wear, consistency, or returns risk (curl mismatch, length spikes, band residue)
The 5 non-negotiable checks (what your team signs off on)
A) Curl consistency (tray-to-tray)
No “mixed curl” look within a tray or between trays of the same SKU.
B) Length map integrity
No random spikes outside the intended map that change the silhouette.
C) Fiber finish
No overly shiny “plastic reflection” under typical product lighting.
D) Band integrity + cleanliness
Band sits flat, clean cut, no visible residue that affects comfort or adhesion.
E) Wear intent match
“Everyday” should read as everyday in photos and on-eye (not unexpectedly dense or dramatic).
Citable snippet: Sampling stays on schedule when approvals are tied to repeatable criteria (curl, length map, finish, band integrity, wear intent)—not subjective “looks good” feedback.
3) Why “C curl” isn’t enough (curl retention is process + handling)
Two trays can both be labeled “C curl” and still behave differently because shape in thermoplastic fibers is influenced by:
batch-to-batch finishing,
heat-setting parameters,
mechanical compression during storage,
temperature swings during transit.
Heat-set thermoplastic filaments can relax/shrink when exposed to temperatures above their glass transition (even far below melting), changing perceived shape over time.
Practical check (no lab tools):
Compare curl and silhouette across multiple trays, not the “best” one.
Add a quick handling check: peel/re-seat one cluster section and ensure the curl/look remains consistent.
Transport test standards commonly model hazards like vibration, drops, and atmospheric conditioning (e.g., wet/frozen conditions), which is why it’s smart to validate shape + presentation beyond a single untouched tray.
5) Actionable takeaway (the anti-re-sampling rule)
Approve with tolerances. Write down:
what’s “acceptable,”
what’s “not acceptable,”
and what changes are allowed without restarting sampling.
If you don’t define those boundaries, every revision becomes subjective—so sampling cycles keep repeating.
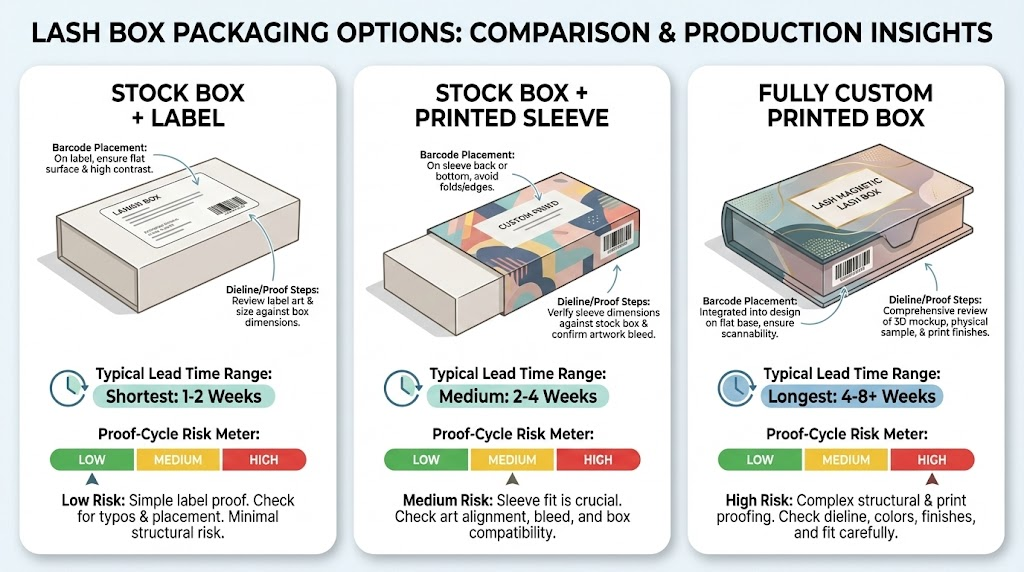
Week 3: Packaging & Labeling (Where Most “X-Week” Launches Slip)
Even when the lashes are ready, you can’t ship without approved, print-ready packaging—and packaging lead times (plus proof cycles) are a common reason launches drift from “6 weeks” to “10+.”
What this week is really about
By the end of Week 3, you want one “print-ready” packaging packet that’s approved and internally consistent:
Dieline (the structural blueprint showing cut/fold/bleed/safe zones)
Final artwork placed on the dieline, plus proof approvals (colors, fonts, bleeds, alignment)
Labeling text checked for compliance basics (outer carton/box is usually the “label” that matters most)
Barcode + SKU system finalized (ideally GS1-issued IDs for uniqueness and retailer/marketplace compatibility)
Stock box structure (fast because the structure is already tooled and production-ready)
Custom printed sleeve or premium label (brand-forward without waiting on full custom box print cycles)
What we finalized (the “don’t let this float” list)
Dieline placement
logo position, front panel hierarchy, window size, safe zones/bleed (A dieline is the packaging “blueprint” that ensures your artwork prints, cuts, and folds correctly.)
Finish choice (kept simple)
matte + one accent (e.g., spot UV or foil) Why: every extra finish can add a proof/approval loop (and introduce more “is this the right shade?” debate).
Barcode + SKU codes
We recommend getting barcodes from GS1 so the identifier is globally unique and tied to your company.
Insert card (aftercare + brand story)
Great for perceived value, but treat it like marketing copy: keep claims specific, supportable, and consistent with your listing.
For lash packaging and inserts, the safest posture is: clear identity, clear contents, clear ingredients (when applicable), and claims that are truthful and not misleading.
If you sell in the U.S., make sure your outer packaging can support:
Net quantity of contents (required for cosmetics in package form; format depends on the product)
Ingredient declaration rules (and related cosmetic labeling requirements under 21 CFR Part 701)
Claims discipline: cosmetic labeling/claims must be truthful and not misleading; FDA does not “pre-approve” cosmetic claims.
Substantiation mindset: FTC guidance for advertising emphasizes that claims must tell the truth, not mislead, and be substantiated.
Practical rule for lash brands: if you can’t explain what you mean and how you’d support it in one sentence, rewrite the claim.
Factory-side insight #3: Packaging tradeoffs that affect timeline (and budget)
Why fully custom boxes take longer
Custom printed boxes tend to require more prepress + proofing + approval steps (artwork on dieline, color checks, bleeds/fonts, etc.), which increases cycle time and “revision risk.”
Why stock + sleeve/label is often the fastest “premium-enough” path
Stock structure = fewer structural decisions
Sleeve/label = you still get strong brand presence
Better for low MOQs because you’re not paying as heavily for full custom print setup and complexity on a first run (unit economics vary by supplier, but the pattern holds: more customization → more steps → more approval loops).
“Can we see one more version?” without a go/no-go checklist
Unlocked brand assets (logo versions, fonts, color codes)
Barcode/SKU confusion late in the cycle (forces artwork edits)
Citable snippet
If launch speed matters, use a proven stock box structure and add branding with a premium label or sleeve—this reduces proofing loops while still delivering a cohesive, retail-ready presentation.
Week 4: Pilot Production (Pilot Run) + Batch-Level QC
Once lash specs and packaging proofs are approved, run a pilot batch (a small first production lot under the final process) before full-scale. This is basic GMP thinking: you’re verifying the process is repeatable at batch level—not just perfect in a single sample.
Citable snippet:A pilot batch de-risks launch because it tests real batch variability (materials, operators, packing, transit) before you commit to the full run.
Traceability: lot/batch code mapping for trays, boxes, and cartons (so issues can be isolated quickly)
How to sample (so it’s not a “best-case” inspection)
Don’t inspect only the easiest cartons. Pull random units across cartons (top/middle/bottom; early/mid/late in packing).
If you want a formal method, use acceptance sampling/AQL concepts (common in manufacturing inspection) and document your chosen plan; ISO’s sampling standards describe lot-by-lot sampling schemes indexed by AQL.
Pilot QC checklist (practical, repeatable, citation-friendly)
Check
How to test (simple)
What to record (for “go/no-go”)
Why it matters
Visual uniformity
Compare left/right lash symmetry; compare across multiple trays
No visible residue, fraying, split bands; note rate of defects
Band defects drive complaints and negative reviews
Curl + length audit (batch-level)
Check multiple trays from different cartons
Your tolerances (e.g., “no mixed-curl appearance”; length-map variance limits)
A single tray can lie; batch reveals reality
Tray fit + presentation
“Tap + tilt” test; ensure lash doesn’t pop loose
Tray holds lashes securely; no lifting/shift
Reduces damaged-looking unboxings
Label/pack alignment
Inspect barcode placement + adhesion after handling
Misalignment rate; adhesion failures; scuffs
Prevents fulfillment and scanning issues
Handling simulation
Gentle peel + re-seat (like a customer)
Band stays intact; lash shape doesn’t collapse
Tests real-use durability
Transit risk (lightweight version)
Short “shake test” + drop from small height (packaged)
Any tray shift, scuffing, seal failure
Shipping damage is a hidden launch killer; formal testing frameworks exist for shipping units
Optional “formalize it” note: If you later sell through stricter retail/3PL channels, you can align transit validation to packaging performance frameworks (e.g., ASTM D4169) rather than only informal shake tests.
A single pre-production sample can be flawless; a batch exposes variability—material lots, heat-setting parameters, packing handling, label adhesion, and transit scuffs.
GMP-style guidance for cosmetics emphasizes controlled production, documented checks, and handling nonconformities—exactly what the pilot phase supports.
Week 5: Content, Compliance Basics, and Logistics (The “Not Glamorous” Week)
Goal (why this week exists): while production runs, you build the launch infrastructure that prevents (1) returns from mismatched expectations, (2) compliance/claims issues, and (3) stockouts caused by slow reordering.
Week 5 outputs (what “done” looks like)
By end of week 5, you should have:
Photo shot list + brief (so your images match the exact SKU/spec)
Reorder trigger (based on lead time + velocity, not vibes)
1) Product photography direction (reduce returns + improve click confidence)
Non-negotiable principle: photos should accurately represent the specific SKU being sold (curl look, map/length range, band style). This protects trust and reduces “not as expected” returns. Google also emphasizes high-quality images for a good user experience and notes that multiple high-quality images are strongly correlated with better user outcomes in shopping contexts.
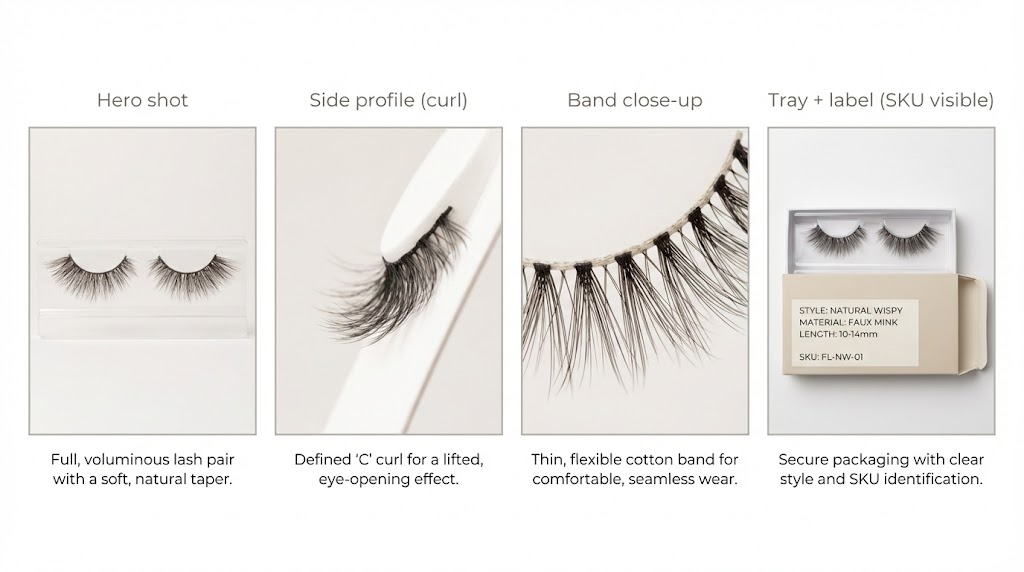
Minimum shot list (works for Shopify + salon wholesale line sheets)
Hero shot (front, clean, accurate curl/shape)
Side profile (shows curl + silhouette)
Close-up of band (clean cut, no residue, flexibility)
Tray + label (SKU name visible; prevents “wrong lash” confusion)
Scale/context (optional but helpful: on-eye photo or map graphic that matches the lengths you sell)
Citable snippet:If your photos don’t clearly show curl/shape and band detail, customers fill in the gaps—and returns go up.
2) Listings (SKU naming + benefit bullets + “what’s in the box”)
SKU naming rules (keep it scannable + unambiguous)
Use a consistent structure so customers can compare quickly:
Collection / Style name + map/length range + finish + band type Example: Everyday Wispy • 10–12 mm • faux-mink finish • flexible band
Benefit bullets template
Look: (everyday / wispy / soft glam)
Best for: (short liner / natural volume / light glam)
Map/length range: (e.g., 10–12 mm or 12–14 mm)
Band: (flexible, clean-cut; comfort focus)
Finish: (soft faux-mink style)
In the box: (pair count, tray type, insert card if included)
Tip: keep your first 1–2 bullets concrete (measurable) before “vibe” language—this improves excerpting for AI answers and helps shoppers decide faster.
3) Claims sanity-check
A) Avoid “drug-like” claims
If you imply treating/preventing disease or affecting the body’s structure/function, you can accidentally shift your product into drug-claim territory under U.S. definitions. Keep lash claims in the lane of appearance and cosmetic use.
Avoid: “heals,” “treats irritation,” “prevents infection,” “stimulates growth,” “safe for sensitive eyes” (as a guarantee). Safer: “designed for everyday wear,” “lightweight feel,” “comfortable band,” “remove if irritation occurs.”
B) Substantiate objective claims (even “simple” ones)
For any objective claim you make (durability, performance, “hypoallergenic,” “latex-free,” “formaldehyde-free,” etc.), you should have a reasonable basis before publishing. That’s the FTC’s core advertising substantiation principle.
Practical rule: if you can’t point to a spec sheet, supplier documentation, or internal test result, soften or remove the claim.
Citable snippet:Make only claims you can support with a reasonable basis before you publish—especially safety/performance statements.
If you’re selling in the U.S., FDA provides a labeling guide and summary requirements (identity, net quantity, ingredient declaration, etc.). If you sell internationally, requirements vary—treat this as a starting checklist, not legal advice.
4) Logistics: master cartons + packing list (so receiving doesn’t break your launch)
Even if you’re “small,” your first operational failure is usually receiving chaos: miscounted cartons, mixed SKUs, or missing paperwork.
Packing list (simple format that scales)
A packing list documents what’s in the shipment and how it’s packed (carton numbers, item counts, weights/dimensions). It’s also used for checks at multiple stages, and some destinations require it for customs.
Include at minimum:
PO number / shipment reference
SKU + SKU name
Units per carton + number of cartons
Carton # (1 of N), gross weight, carton dimensions
Total units + totals (weight/cartons)
Master carton label (what to print on every carton)
If you want to be “retail-ready” later, align carton identification to widely used logistics labeling standards (GS1 has guidance for identifying logistics units).
Minimum carton label fields (human-readable):
Brand + PO/reference
SKU(s) inside (or “mixed”)
Qty per SKU + total qty
Carton number (e.g., 3/12)
Lot/batch code (if you use one)
Destination (your warehouse / 3PL)
Optional (future-proof): add serialized carton IDs (useful for 3PLs and audits).
5) Reorder triggers (don’t use a %—use a formula, then translate to a %)
Your original “30–40% remaining” rule is a decent heuristic, but to be more trustworthy and repeatable, anchor it to standard inventory logic:
Reorder point (ROP) = demand during lead time + safety stock.
Simple way to implement (no tools required)
Estimate average weekly sales per SKU (or conservative forecast).
Confirm lead time in weeks (production + freight + receiving buffer).
Pick a small safety stock buffer (to cover demand spikes or delays). ASCM describes safety stock as a buffer against variability and forecast error.
Translation into an easy rule: once you compute ROP, you can express it as a rough “% remaining” for your first run. The % varies by lead time and sales speed—so it’s more reliable than a fixed 30–40% for everyone.
Citable snippet:Low MOQ lowers risk, but it shortens your runway—so reorder timing should be set from lead time demand + safety stock, not a generic percentage.
Week 6: Final Assembly, Pre-Launch QA, and Go-Live (Return-Prevention Week)
Week 6 is about one thing: shipping units that arrive clean, match the correct SKU, and don’t create avoidable customer complaints—especially for eye-area products.
Goal for Week 6
A launch is “ready” when you can confidently say:
The product + packaging match the SKU (no mix-ups),
Labels are correct and durable,
Units survive basic transit stress,
You can trace and fix issues quickly (batch/lot + QC notes).
Pre-Launch QA Checklist (Minimum-Viable, but Standard-Aligned)
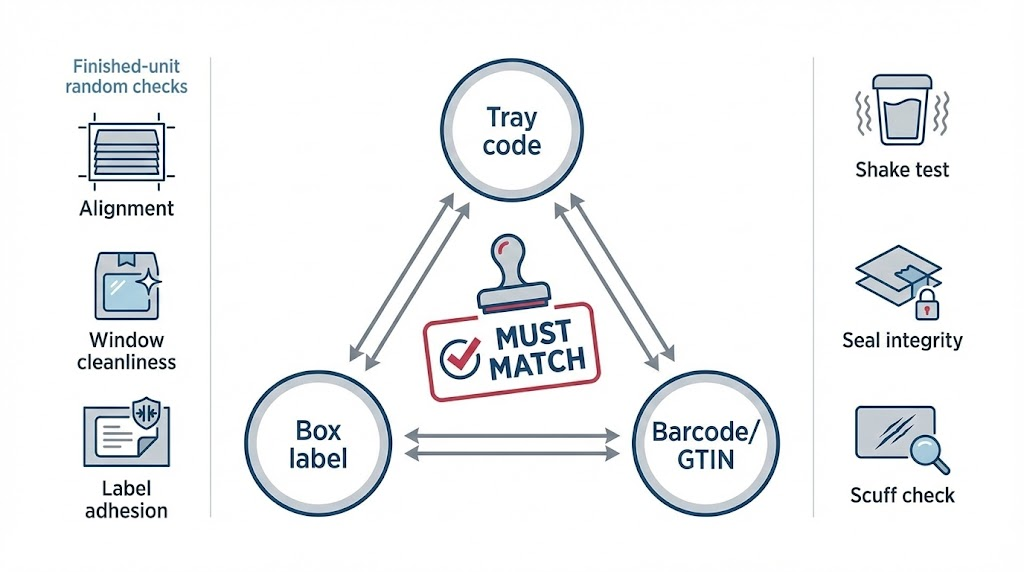
1) Random finished-unit checks (from sealed cartons)
What we pulled: a small random sample from each SKU’s finished cartons (enough to catch obvious assembly drift).
What we checked (pass/fail):
Packaging alignment: tray sits straight; window looks intentional (no skew)
Window cleanliness: no scratches, dust, fingerprints
Label adhesion: label corners don’t lift after light rubbing
Scuff risk: outer surface doesn’t mark easily with normal handling
Why this matters: Packaging defects are among the easiest “silent killers” of first-run reviews and returns—and they’re cheapest to catch before shipping.
Citable takeaway: Pre-launch QA should inspect finished, sealed units—not just pre-assembly components—because most early returns are caused by packaging presentation, SKU mismatches, and transit damage.
2) Label sanity-check (don’t let “launch week” create compliance debt)
For cosmetics sold in the U.S., labeling is regulated (identity of the product, net quantity, business name/place, and other required elements depending on your product/claims).
What we verified in Week 6 (quick but effective):
The SKU name on the label matches the product listing name (reduces customer confusion)
Any warnings / directions are consistent across box, insert, and PDP copy
The label is readable at normal viewing distance and won’t smudge easily
Operator note: This isn’t legal advice—just a “launch hygiene” check so you don’t have to reprint labels immediately after go-live.
3) SKU match verification (3-way “no-mistakes” rule)
We ran a simple 3-way match before any units left the building:
tray code ↔ box label ↔ barcode/GTIN
If you’re using barcodes for retail or marketplace workflows, use legitimate, globally unique identifiers (GS1 GTINs) to avoid downstream listing and inventory issues.
Pass criterion: If any one of the three doesn’t match, the unit is quarantined until resolved.
4) Transit risk checks (simple tests, mapped to real standards)
Even a “pretty” product fails if the tray shifts, the window scuffs, or seals pop during shipping.
What we did (fast, operator-friendly):
Shake test: does the tray shift, pop loose, or shed fibers?
Seal integrity: does the closure scuff, crease, or open under light stress?
Drop awareness: would a typical small-parcel drop dent corners or crack windows?
Why we can justify these checks: Packaging test standards like ISTA procedures and ASTM D4169 exist specifically to simulate common transport hazards (shock/vibration/handling) and reduce damage in distribution.
(You don’t have to run full certification testing for a small launch, but aligning your checks to these hazard categories improves reliability and documentation.)
FAQ gaps (what customers keep asking = what your PDP didn’t clarify)
Documentation we kept (trust + scalability):
QC log + photo examples of pass/fail
Batch/lot notes tied to SKUs
Packaging proof version used at launch This kind of production/control/shipment documentation aligns with widely used cosmetics GMP guidance like ISO 22716.
Result: They launched on time with 3 SKUs and a clean first-run presentation—then used customer feedback to plan the next drop (new curl + one bolder map).
Common Mistakes (and Fixes) We See in “X-Week” Launches
Too many SKUs too soon
Fix: Launch 2–4, then expand after you see sell-through.
Approving samples without criteria
Fix: Approve with “must-have” rules + tolerances.
Packaging perfectionism
Fix: Use stock + label/sleeve for the first run; go fully custom later.
Ignoring tray + band details
Fix: Band cleanliness and tray fit reduce returns.
No plan for reorder timing
Fix: Set reorder triggers (e.g., when inventory hits 30–40%).
Quick Checklist: Launch Private Label Lashes in X Weeks
Decide SKU count + hero SKU
Lock specs: fiber, curl, diameter, length map, band style
Approve sample with criteria + tolerances
Choose packaging approach (stock+label vs custom print)
Finalize barcode/SKU system
Run pilot batch + batch-level QC
Confirm tray fit + transit stability
Prepare product photos + listing copy
Create reorder trigger plan
Final QA on finished packaged units
FAQ
How fast can a private label lash brand launch, realistically?
If you use proven specs and simpler packaging, 4–6 weeks is often realistic. Fully custom packaging, more SKUs, and slow approvals can push timelines to 8–10+ weeks.
What slows launches down the most?
Packaging proof cycles, unclear sample feedback, and adding new custom elements midstream (special finishes, custom inserts, unusual box structures).
Can we launch with a low MOQ and still look premium?
Yes. Premium feel comes from consistency, clean finishing, and smart packaging choices (like sleeves, matte labels, good tray presentation), not just expensive box printing.
Do we need to worry about sensitive eyes in product copy?
Keep claims conservative and customer-friendly. If customers report irritation, advise them to stop use and seek professional guidance. (We can share general, evidence-informed guidance, but if you have persistent irritation, swelling, pain, or vision changes, please stop use and consult an eye-care professional.)
When should we reorder?
Set a trigger before you’re low—many brands reorder when inventory hits 30–40% remaining, depending on lead time and sales velocity.
Key Points
Launch speed is mostly about decision speed, not production speed.
Keep first drops small: 2–4 SKUs is easier to execute cleanly.
Approve samples with measurable criteria (curl, length tolerance, band finish).
Packaging is the biggest variable—stock + label/sleeve can launch fast and still look branded.
Batch-level QC prevents costly returns and reputation damage.
Low MOQ reduces risk, but you need a reorder plan earlier.
A pilot run is a smart “insurance policy” before full packaging assembly.
Conclusion: How to Hit “X Weeks” Without Cutting Corners
If you want to go from concept to launch in X weeks, the path is straightforward:
lock specs early, 2) approve with rules, 3) keep packaging practical, 4) QC at batch level, 5) prepare launch assets while production runs.
That’s exactly how Luna Studio Lashes hit a 6-week launch—without skipping the unglamorous steps that protect customer experience.
If you want, we can help you map a timeline based on your exact scope (SKU count, packaging complexity, MOQ target) and recommend the fastest route that still delivers stable quality, customized lash styles, and factory-direct pricing.
Ready to map your own timeline? We can help you develop the fastest and most compliant private label route based on your SKU quantity, packaging complexity, and MOQ target.
International Organization for Standardization (ISO). (2007). ISO 22716:2007 — Cosmetics — Good Manufacturing Practices (GMP) — Guidelines on good manufacturing practices.
International Organization for Standardization (ISO). (2026). ISO 2859-1:2026 — Sampling procedures for inspection by attributes — Part 1: Sampling schemes indexed by acceptance quality limit (AQL) for lot-by-lot inspection.
At LashVee, we help lash brands and professional buyers avoid common sourcing mistakes—from inconsistent curl and fiber quality to unstable band bonding in mass production. Our work focuses on translating design intent into repeatable, production-ready lash styles.
If you’re evaluating suppliers, refining a lash design, or planning a private label order, we’re happy to share practical input or provide samples to support your decision.