This guide is a factory-side prevention playbook you can apply to bulk production so finished goods match the “golden sample.”Learn about our OEM and ODM services for consistent production.
1-Minute Answer
To prevent shedding, bent bands, and curl inconsistency in bulk lash production:
Control heat-setting like a critical process (time/temperature, rod condition, cooling method) because lash fibers are commonly thermoplastic and curl can drift when parameters drift.
Treat peel force as a product spec (tray adhesive + strip geometry) to prevent shedding caused by removal stress rather than “bad fiber.”
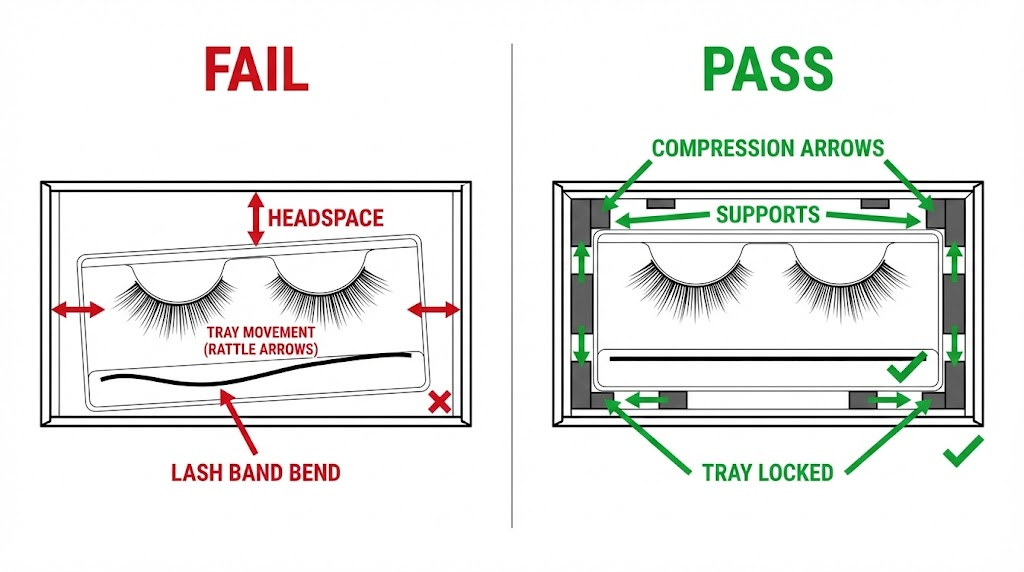
Engineer packaging for compression paths (tray support, headspace control, carton strength, stack limits) so pressure lands on tray edges—not lash bands.
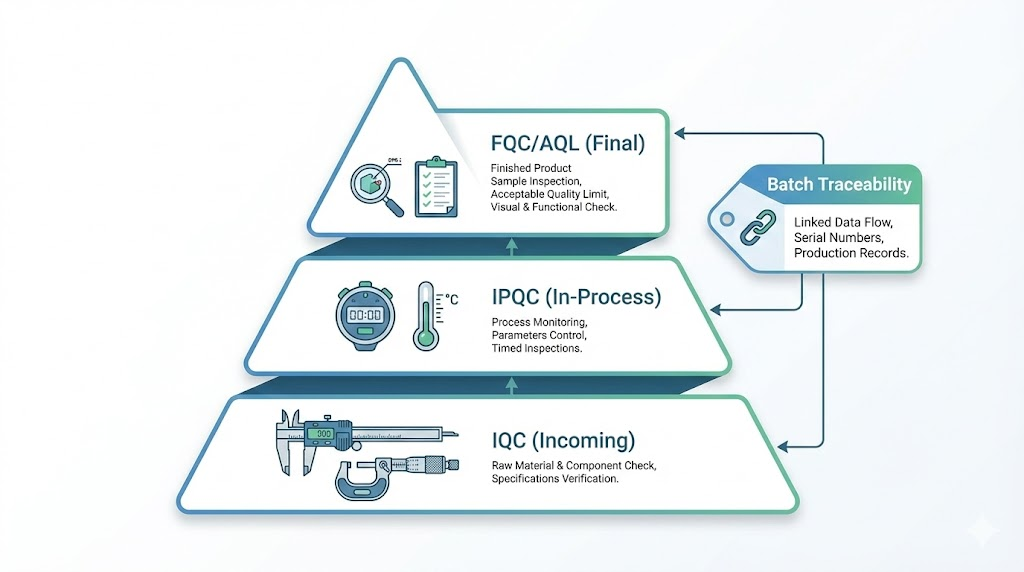
Catch drift early with IQC + in-process checks + AQL final inspection + batch traceability.
If you only do 3 things: (1) golden sample + measurable limits, (2) logged heat-setting parameters, (3) packaging “no-rattle + edge-supported compression.”
Definitions
In this article:
Shedding (manufacturing): fibers detach from strip/band or loosen due to weak bonding, contamination, cutting damage, or excessive peel force during tray removal.
Bent band: band arrives wavy/creased due to compression + heat + time + insufficient packaging support.
Curl inconsistency: curl varies row-to-row or batch-to-batch due to heat-setting drift, rod wear/mixing, cooling inconsistency, or fiber-lot variation.
Citable takeaways
Bulk defects usually come from a measurable variable drifting (heat profile, bonding conditions, peel force, or packaging compression)—not from “bad luck.”
Peel-force control prevents many shedding complaints without changing lash aesthetics because many failures are removal-stress failures, not fiber failures.
Bent bands are most often a packaging engineering failure: excess headspace + weak tray + carton stacking pressure turns transit into a bending machine.
Curl consistency is process control: lock time/temperature, rod condition, cooling, and lot traceability so “curl” is controlled, not just labeled.
What you’ll get from this page (clarifies value instantly)
A defect map (where problems begin)
Root-cause checklists + the fastest prevention levers
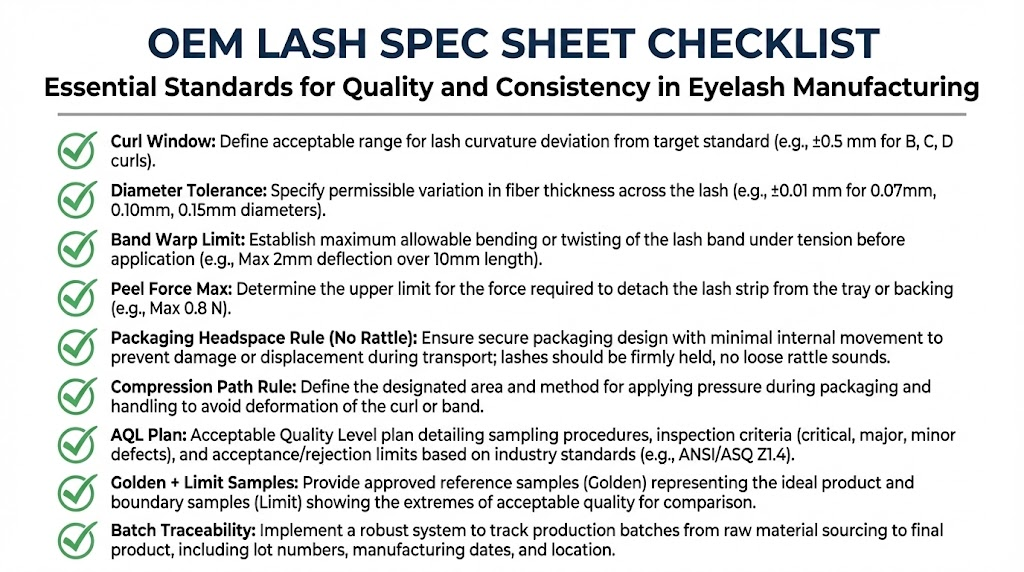
A simple OEM/private label spec sheet checklist you can copy into a purchase order
This framework reflects factory-side production realities: materials vary by lot, processes drift by shift, and packaging/transit can create defects after QC. Use the checklists to turn “soft/fluffy/consistent” into measurable acceptance limits you can enforce.
Quick Answer / TL;DR
Lock a measurable spec (curl window, diameter tolerance, band thickness/softness, bonding strength) and approve a golden sample for every SKU.
Control the curl-setting process (time/temperature, rod condition, cooling) because most lash fibers (often PBT) are thermoplastic and can shift with heat exposure.
Prevent shedding by fixing the root: contamination at the base, weak bonding, over-handling, or aggressive peel force during tray removal.
Prevent bent bands by designing packaging for compression, not just “pretty display” (tray support + headspace control + carton strength).
Use QC that catches drift early: incoming material checks + in-process checks + AQL final inspection + batch traceability.
Measurable Specs + Test Methods (Copy/Paste Template)
If you want bulk production to match the “perfect sample,” you need two things per SKU:
a spec sheet with measurable tolerances (what “pass” means), and
This is what makes an article citable: anyone can run the same checks and get comparable results.
The “Golden Sample” rule (how consistency is actually enforced)
For every SKU, approve:
Golden Sample (the target reference)
Limit Samples: one “PASS edge” and one “FAIL” example for curl/band/shedding appearance
Then every inspection becomes: compare to limits + confirm with a measurement.
Citable snippet: Bulk drift is usually a tolerance problem, not a talent problem—if “pass” isn’t defined and measured, production will eventually wander.
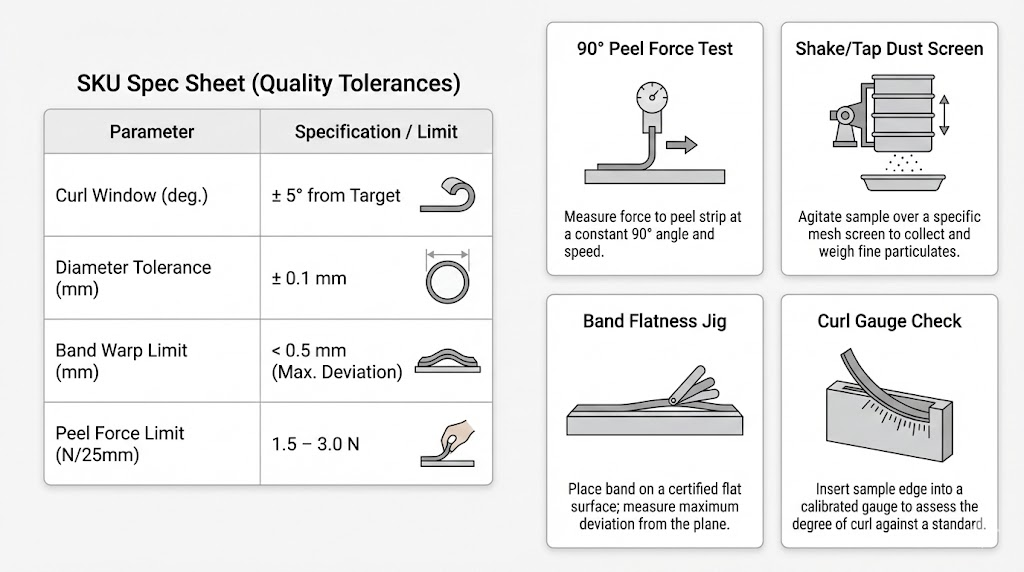
SKU Spec Sheet (CTQ: Critical-to-Quality items)
How to use: Fill targets based on your golden sample. Start with placeholders (no guessing), then lock numbers after 1–3 pilot batches.
A) Product specs (what the customer experiences)
Spec item (CTQ)
Target (per SKU)
Tolerance / Window
Measurement method
When to check
Curl type (label)
e.g., C / D / CC
Curl window defined by your gauge (see 0.3.5)
Curl gauge + photo standard
IPQC + FQC
Length set
e.g., 8–15 mm
± per your spec
Caliper/ruler on defined reference point
IQC + FQC
Fiber diameter
e.g., 0.07
± per your spec
Micrometer / supplier COA + spot verify
IQC
Band thickness
Target value
± value
Caliper at defined positions
IPQC
Band flatness/warp
“flat”
Max warp (mm)
Flatness jig (see 0.3.3)
FQC + ship-test
Shedding resistance
“no visible fiber dust”
Pass/Fail + peel-force limit
Peel test + shake test (0.3.1/0.3.2)
IPQC + FQC
Tray removal effort
“easy peel”
Peel force max (N)
90° peel test (0.3.1)
IPQC
B) Packaging specs (what protects the product)
Packaging CTQ
Target
Acceptance rule
Quick check
Headspace control
“minimal movement”
No rattle when closed
Rattle test (0.3.4)
Compression path
pressure on tray edges
No load on lash line/band
Visual contact map + compression check
Tray rigidity/support
stable
No tray bowing under load
Compression check + post-test band flatness
Carton stacking rule
defined
max stack height / load
SOP label + ship-test log
Citable snippet: Packaging is part of product quality: if the tray can move, the band becomes the shock absorber. For custom packaging ideas, check our eyelash packaging guide.
Test Methods (repeatable, auditable, easy to cite)
Below are short “method cards” you can keep consistent. Each method is designed to be:
easy for operators, and
easy for brands to reference in a PO/QC agreement.
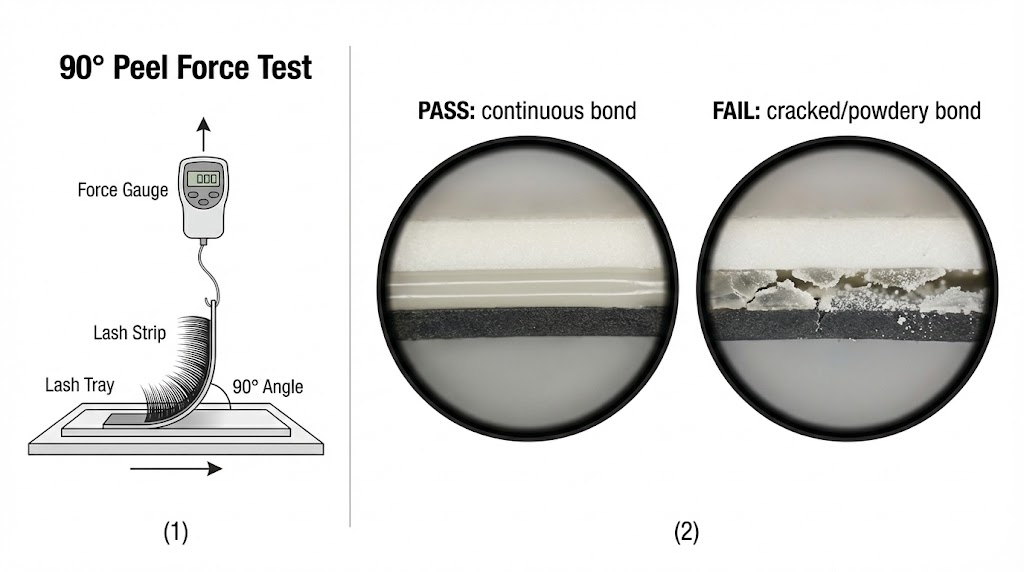
Peel Force Test (Tray Removal Stress)
Purpose: quantify mechanical stress that causes “shedding complaints” during tray removal.
Equipment: simple force gauge (or spring scale), fixture to maintain 90° peel angle, timer. Sample size: define (example: 3 trays per batch, 2 strips per tray). Procedure:
Condition samples at room temp for a consistent time window.
Peel strip from tray at 90° at a consistent speed (e.g., steady hand + timer standard).
Record peak force and any fiber release. Pass/Fail:
PASS if peak force ≤ your limit and no abnormal fiber release vs golden sample. Record: batch ID, tray type, tape/adhesive lot, peak force, operator.
Why this earns citations: it converts “hard to remove” into a measurable spec.
Compare to gauge and the golden/limit photo standards.
Record “within window” or “out of window.” Pass/Fail:
PASS if within your defined curl window and matches pass-limit sample. Record: fiber lot, rod ID, heat profile record, result.
Citable snippet: Curl consistency is a process parameter outcome—if the heat profile, rods, and cooling steps are controlled and logged, curl drift becomes predictable and preventable.
Start With a Defect Map (Where Problems Actually Begin)
Most “finished product” defects begin earlier than people think. We like to map defects to four zones:
Material inputs (fiber polymer lot, finish/coating, band material, adhesives/tapes)
weak base bonding OR contamination OR peel force too high
strengthen bond spec + reduce peel stress via tray/strip design
Band arrives wavy/creased
packaging compression + heat + band softness mismatch
add band supports + reduce headspace + carton strength rules
Curl varies row-to-row or batch-to-batch
heat-setting drift + rod wear + cooling inconsistency
lock heat profile + rod maintenance + curl gauge inspection
Citable snippet: If bulk production doesn’t match the sample, it’s usually because a measurable process variable drifted (heat profile, bonding conditions, or packaging compression)—not because the style “can’t be made consistently.”
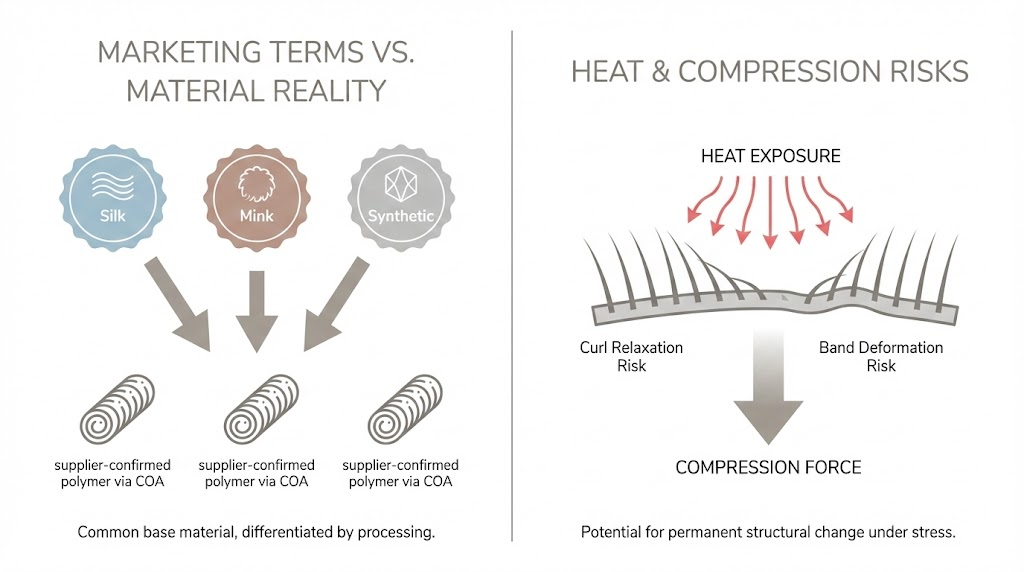
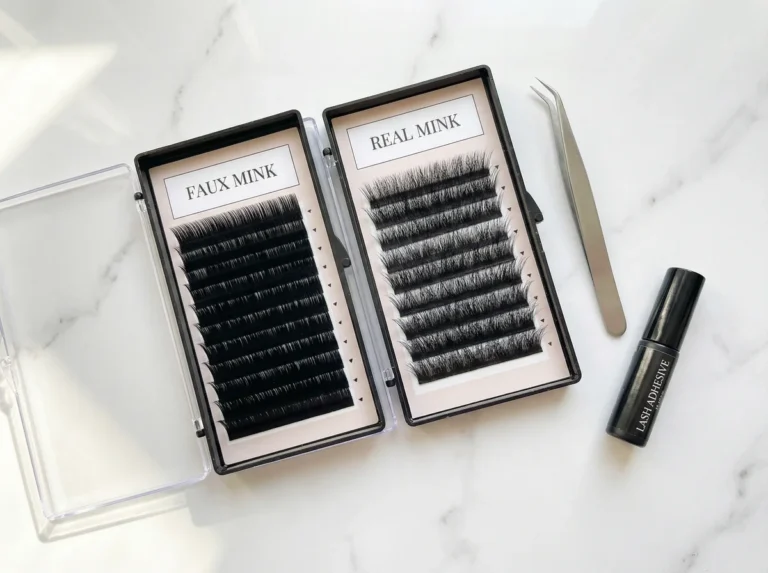
Materials Reality: What “Silk / Mink / Synthetic” Usually Means (and Why Heat + Pressure Change Lashes)
In lash manufacturing, marketing names aren’t material specifications. Terms like “silk” and “mink” often describe finish, taper, sheen, and softness, not a guaranteed fiber composition—many suppliers use these labels for synthetic fibers such as PBT with different surface treatments.
What’s usually true (but not always):
Many modern lash extensions and many synthetic lash styles are commonly described by brands/suppliers as being made from PBT (polybutylene terephthalate).
The industry has also been shifting away from real mink fur toward synthetic alternatives (ethical + consistency reasons).
However, “synthetic” does not guarantee PBT—some suppliers use other polymers or blends. The only reliable answer is your supplier’s COA/lot documentation (and your incoming tests).
What PBT is (useful for defect prevention, not marketing)
PBT is widely described in polymer references as a semi-crystalline thermoplastic polyester. Because it’s thermoplastic, its shape (curl) is typically created by heat-setting, and later exposure to heat + stress can increase risk of creep/relaxation depending on formulation, crystallinity, and how much stress the product is under.
A practical “engineering” point you can cite: thermal analysis references commonly report PBT’s glass transition in the low-40s °C (example DSC midpoint ~42°C) and melting peaks in the ~217–226°C range. That doesn’t mean lashes “melt” in shipping—but it does mean warm environments + compression can raise deformation risk.
Why this matters for shedding, bent bands, and curl drift
In real distribution, products can see heat spikes (e.g., sun-heated containers/trailers) and long dwell times under load; logistics sources commonly warn that container interiors can climb to roughly the high-50s to ~60°C in hot conditions. So treat heat exposure + packaging compression paths as part of product engineering—not an afterthought.
Band material + softness/thickness target (and how deformation is judged)
Packaging compression design assumptions (where pressure is allowed to land)
Prevent Shedding (Fiber Drop) Without Making Lashes Stiff
Define the defect first (so you don’t “fix” the wrong problem):
Manufacturing shedding: fibers detach from the strip/band or loosen during removal from the tray/strip.
In-field fallout: detachment during wear (often adhesive, environment, or technique). This section targets manufacturing shedding (the part you can control before shipping).
Diagnose (most likely root causes, ranked)
Cause 1 — Peel stress is too high during tray/strip removal Even with acceptable bonding, customers can mechanically pull fibers out if removal requires a sharp, high-force “rip.”
Cause 2 — Contamination at the bonding zone Oils, dust, release agents, or excessive handling at the root can reduce bond reliability.
Cause 3 — Bonding area is insufficient or inconsistent A bond line can look “clean” but still be weak if the effective bonded area is too narrow or varies.
Cause 4 — Cure / heat-bond drift (over/under) Small parameter drift can turn the root brittle (over) or weak (under).
Cause 5 — Cutting/tooling damage at the base Nicks or micro-cracks at the root become the first failure point.
Confirm (5-minute checks that distinguish causes)
Check 1: Controlled peel-force check (simple and repeatable)
Use a consistent peel angle + speed, then record the force needed to remove a strip/tray sample.
The key is repeatability (same angle/speed/sample width). This borrows the principle of controlled peel tests used for pressure-sensitive materials (e.g., peel tests described in ASTM D3330 guides), even if your lash method is custom.
Check 2: Root inspection under magnification Look for: gaps, powdery/brittle bond, cracks, uneven bond width.
Check 3: “Gentle shake/tap” debris check (standardized) Use the same number of taps/shakes on a defined sample count and record visible fiber dust.
Decision shortcut:
If peel force is high → solve mechanical stress first (tray/strip design), then tune bonding.
If peel force is normal but shedding occurs → focus on bonding/contamination/tooling.
Prevent (controls + acceptance rules)
Prevention lever 1 — Make peel force a product spec
Specify an upper limit and test it at fixed intervals (start/mid/end of run).
Reduce peel stress with tray adhesive choice, strip geometry, spacing, and removal ergonomics.
Prevention lever 2 — Lock the bonding zone conditions
“No-touch” handling rules near the root
Clean bench + lint control + gloves
Bond area target (width/area) + interval checks
Prevention lever 3 — Stabilize cure/heat-bond parameters
Treat time/temperature/pressure (or equivalent) as critical parameters
Record drift and adjust before it becomes a returns spike
Prevention lever 4 — Tooling discipline
Blade change intervals
Focus inspection on root integrity (not only appearance)
What to measure (so this section is citable)
Peel-force limit (repeatable method)
Bond width/area target (with tolerances)
Root integrity acceptance rule (no cracks/gaps under magnification)
A large share of “shedding complaints” are mechanical failures during removal: if you quantify and cap peel force with a repeatable method, you can reduce shedding without over-bonding (and without making lashes stiff).
Prevent Bent Bands (Deformation) During Packing and Shipping
Diagnose (most likely root causes, ranked)
Cause 1 — Packaging compression path loads the band line Pressure lands on the band instead of tray edges/corners.
Cause 2 — Headspace allows movement (rattle = bending machine) If the tray can shift, the band becomes the shock absorber.
Cause 3 — Tray structure is too flexible Trays bow under stacking pressure; bands deform as the tray flexes.
Cause 4 — Heat exposure + time under load increases deformation risk Many polymers used in consumer products are thermoplastic and can soften/deform more under heat and sustained stress; PBT itself is a semi-crystalline thermoplastic polyester used widely in engineering contexts. (Practical takeaway: you design packaging for compression and for thermal exposure windows.)
Cause 5 — Carton stacking/strapping without limits Outer-carton compression translates into inner unit deformation.
Confirm (5-minute checks that distinguish causes)
Check 1: Rattle test (binary, brutal, effective) Close the unit box and shake it: any movement = redesign needed (add supports / reduce headspace).
Check 2: Compression path check (where does load land?) Apply light, even top pressure and inspect contact points: pressure should route to tray edges/corners, not lash bands.
Check 3: Quick transport simulation If you can, run a basic drop + vibration check on packaged samples. ISTA test procedures commonly include drops, vibration, and conditioning to reflect distribution hazards. (You don’t need full certification to benefit—use the concept to find weak packaging fast.)
Prevent (controls + acceptance rules)
Prevention lever 1 — Engineer the compression path
Add tray ribs/pillars
Make the lid/insert contact tray edges
Prevent “top pressure” from landing on band line
Prevention lever 2 — Eliminate headspace / tray shift
Tighten tolerances
Use locking features (tabs, rails, corner blocks)
Add inserts that stop lateral movement
Prevention lever 3 — Add carton rules (brands forget this step)
Carton strength requirements
Max stack height
Strapping limits / “do not compress” where appropriate
Bent bands are usually a packaging mechanics problem: if the tray can move or compression loads the band line, deformation becomes likely—especially after time under load and heat exposure.
Cause 1 — Heat-setting drift (time/temperature/throughput) Small drift across shifts/loads creates visible curl variation.
Cause 2 — Rod condition / sizing inconsistency Mixed rod diameters, wear, residue, or mislabeling = mixed curl outcomes.
Cause 3 — Fiber lot variation Even when suppliers label material similarly, lot-to-lot variation can change response to the same heat profile (so you must track lots, not just “material name”).
Cause 4 — Cooling method inconsistency Cooling can affect how “set” the curl becomes; inconsistent cooling yields inconsistent curl.
Cause 5 — Post-production heat exposure Finished goods exposed to heat (storage/transit) can increase drift risk because common polymers are thermoplastic; PBT is a semi-crystalline thermoplastic polyester (widely documented), and thermoplastics generally become more deformable with heat.
Confirm (5-minute checks that distinguish causes)
Check 1: Curl gauge check at timed intervals Measure curl from fixed checkpoints (e.g., every X trays or every Y minutes) and log outcomes.
Check 2: Rod audit Confirm: rod diameter label, wear level, residue, and that rods aren’t mixed across stations.
Check 3: Lot comparison If curl complaints spike after a fiber lot change, compare curl outcomes between old vs new lot under the same heat profile.
Check 4: Heat exposure vulnerability check (packaged sample) Expose packaged samples to a controlled warm condition and re-check curl (simple screening, not a lab claim). If you already use distribution testing concepts, ISTA procedures often include conditioning as part of simulating transit environments.
Prevent (controls + acceptance rules)
Prevention lever 1 — Treat curl as a controlled process (not a label)
Lock time/temperature windows
Log parameters (so you can prove consistency)
Adjust when drift appears (before batch completion)
Prevention lever 2 — Rods are measuring tools
Label, clean, and retire rods on schedule
Ban mixing rod wear levels within a run
Prevention lever 3 — Lot traceability + “golden sample” reference
Record fiber lot per batch
Maintain golden + limit samples at the station for pass/acceptable/fail comparison
What to measure (so this section is citable)
Curl window (acceptable range)
Rod ID + condition (pass/fail)
Heat profile logs (time/temperature)
Cooling step definition (time/method)
Citable snippet:
Curl becomes inconsistent when any critical variable drifts—heat profile, rod condition, cooling method, or fiber lot—so prevention is making curl a controlled process with logs and limit samples, not just a styling name.
Build QC That Prevents Defects (Instead of Only Catching Them)
Catching defects at final inspection is expensive. Preventing them means measuring earlier.
Even for “beauty accessories,” the logic is the same as broader manufacturing QC: define critical parameters, monitor them, and correct drift early (a basic principle behind statistical process control in production). Detailed QC tolerances available here.
Two practical tools that help a lot
Golden sample + limit samples (pass/acceptable/fail examples)
Batch traceability (so you can pinpoint where a defect entered)
Packaging & Logistics Controls (The “Silent Defect Maker”)
We’ve seen perfect lashes leave the factory and arrive defective because packaging wasn’t engineered for reality.
Simple logistics rules that prevent surprises
Define storage limits (temperature/humidity ranges if possible)
Use cartons that resist compression
Limit stacking height
Add edge protection for pallets
Avoid “empty space” inside unit boxes (movement = deformation)
If you ship globally, treat packaging as part of product engineering—especially for higher curls and softer bands that deform more easily.
How to Brief an OEM/Private Label Order to Lock Consistency
When brands get defects, the root cause is often an incomplete brief:
“C curl, 0.07, 8–15 mm” is not enough.
You also need tolerances and acceptance rules.
A spec sheet that prevents defects includes:
Curl window (what range is acceptable)
Diameter tolerance (and how it’s measured)
Band rules (thickness/softness, deformation limit)
And yes—sometimes the best prevention is strategic: if you want deep customization and ultra-stable bulk repeatability, you may need higher MOQ or longer sampling cycles to stabilize the process. That’s the real tradeoff behind “low MOQ vs full OEM.”
Quick Checklist: Defect Prevention in 10 Minutes
Confirm fiber lot and record it per batch
Verify curl rods (labeled, consistent, clean, not worn)
Log heat-setting time/temperature and cooling method
Run peel force spot check (don’t rely on “feels ok”)
Check bond line consistency under magnification
Do a packaging rattle test (should be “no movement”)
Run compression check (pressure lands on tray edges, not bands)
AQL final inspection includes shedding + curl + band shape
Keep a golden sample and limit samples at QC station
Maintain batch traceability for fast root-cause correction
Common Mistakes & Fixes
Mistake: “We’ll fix it in final QC.” Fix: move the check upstream—curl and bonding must be controlled during production.
Mistake: Choosing packaging for looks only. Fix: design packaging for compression, movement control, and stacking.
Mistake: Accepting “same material” as proof of consistency. Fix: track fiber lots and compare outcomes; “PBT” still varies by formulation and processing.
FAQ
What’s a realistic acceptable curl variance?
It depends on curl type and style sensitivity. Stronger curls and longer lengths show drift more visibly, so their acceptable window is usually tighter. Start by defining what “pass” looks like with physical limit samples.
Why are samples perfect but bulk production inconsistent?
Samples are often made slower, by senior operators, and may not reflect full-line conditions. Bulk exposes drift in heat profile, rod wear, bonding speed, and packaging compression—especially across multiple shifts.
Can heat during shipping really change curl?
It can increase risk, especially with thermoplastic materials. Heat exposure may soften and relax shapes depending on duration and packaging support.
How do we reduce shedding without making lashes stiff?
Don’t “over-bond.” First reduce peel stress (tray/strip design), eliminate contamination, then tune bonding parameters to meet a measurable strength target.
What QC evidence should we ask an OEM factory to provide?
At minimum: measurable specs, inspection records, batch traceability, and a defined plan for nonconforming goods.
Factory-side Info Gain (What We’ve Learned the Hard Way)
Peel force is an overlooked spec—and it’s one of the fastest ways to reduce “shedding complaints” without changing lash aesthetics.
Rod maintenance is curl consistency. Mixing rod wear levels can create “random” curl drift that looks like a fiber problem.
Packaging headspace causes deformation. If the tray can move inside the box, you’re shipping a bending machine.
Key Points
Shedding is often a mechanical stress + bonding consistency problem, not just “bad lashes.”
Bent bands are typically packaging compression + headspace + heat exposure.
Inconsistent curl comes from heat-setting drift, rod condition, cooling, and fiber lot variation.
Prevent defects by controlling measurable variables upstream, not only inspecting at the end.
Treat packaging as part of product engineering—especially for softer bands and higher curls.
For private label/OEM, a complete spec sheet + golden sample system protects bulk consistency.
Low MOQ is possible, but deeper customization may require extra sampling to stabilize processes.
Conclusion
If you want fewer defects in bulk, focus on three levers: measurable specs (including peel force and curl window), 2) process control for heat-setting and bonding, and 3) packaging engineered for compression and transit.
If you’re building an OEM/private label line and want us to sanity-check your spec sheet (or help translate “fluffy, soft, dramatic” into measurable tolerances), we can share a practical template and recommend a QC plan that fits your MOQ and target price—without over-complicating the product. Contact us for a quote or consultation.
At LashVee, we help lash brands and professional buyers avoid common sourcing mistakes—from inconsistent curl and fiber quality to unstable band bonding in mass production. Our work focuses on translating design intent into repeatable, production-ready lash styles.
If you’re evaluating suppliers, refining a lash design, or planning a private label order, we’re happy to share practical input or provide samples to support your decision.