
This guide explains which lash manufacturing tolerances actually affect consistency (curl, length, diameter, and band/base), what “typical working ranges” look like, and what measurement proof to request so reorders match.
Introduction
When people say “lash quality,” they often mean how it looks on the eye. In manufacturing, quality is mostly about something less glamorous: tolerances—the allowed variation in length, curl, diameter, density, band size, and finish from one lash to the next and one batch to the next.
From the factory side, we’ve learned a simple truth: not every tolerance matters equally. Some tiny deviations are invisible in wear. Others create immediate issues—uneven maps, inconsistent fans, stiff bands, messy bases, or “this tray looks different than last time” complaints.
Below is how we think about tolerances that actually move the needle, how we control them, and what you should ask a manufacturer to prove (not promise).
Quick Answer / TL;DR
- Curl + length are the biggest drivers of reorder consistency.
- Diameter tolerance changes softness, darkness, and fan behavior more than most expect.
- Band/base tolerances decide comfort and usability (strip bands, premade bases).
- AQL sampling + defined measurement methods beat “100% inspected” claims.
- Traceability (lot codes + retained samples) makes fixes fast and credible.
- Visual standards (sheen, taper, color) should be agreed under the same lighting.
What “tolerance” really means in lash QC
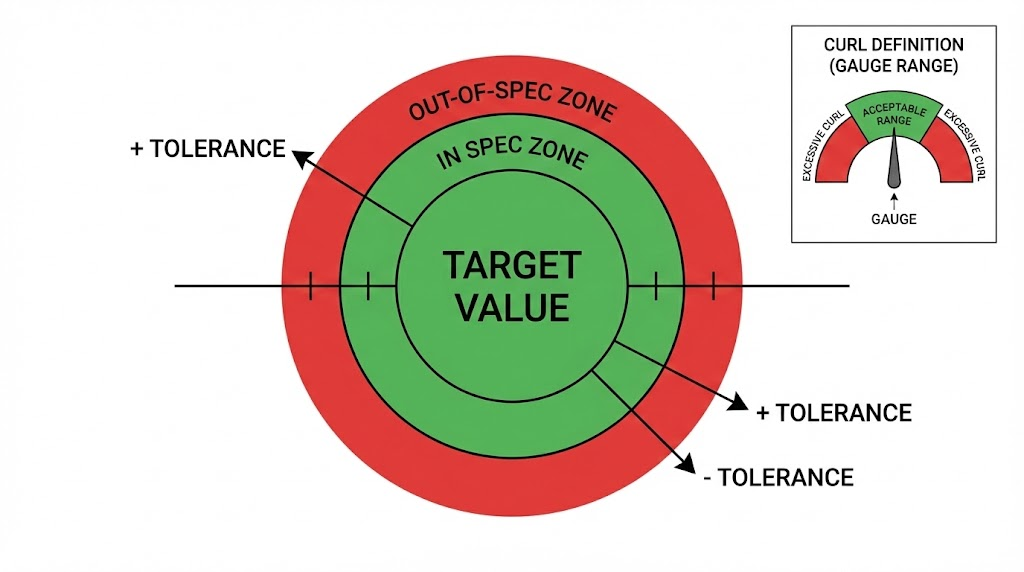
A tolerance is the allowed range around a target specification.
- If the spec is 10 mm length, the tolerance might be ±0.5 mm.
- If the spec is 0.07 mm diameter, the tolerance might be ±0.005 mm.
- If the spec is C curl, the tolerance might be defined by curl gauge range or arc angle range (how you define it matters).
Why this matters: Lash products are visual, but they’re also mechanical—they must pick up cleanly, fan predictably, apply comfortably, and match future reorders. Tight tolerances reduce variation; smart tolerances reduce cost without losing consistency.
A “tight” tolerance is only useful if it’s paired with a repeatable measurement method (same tool, same environment, same definition of pass/fail).
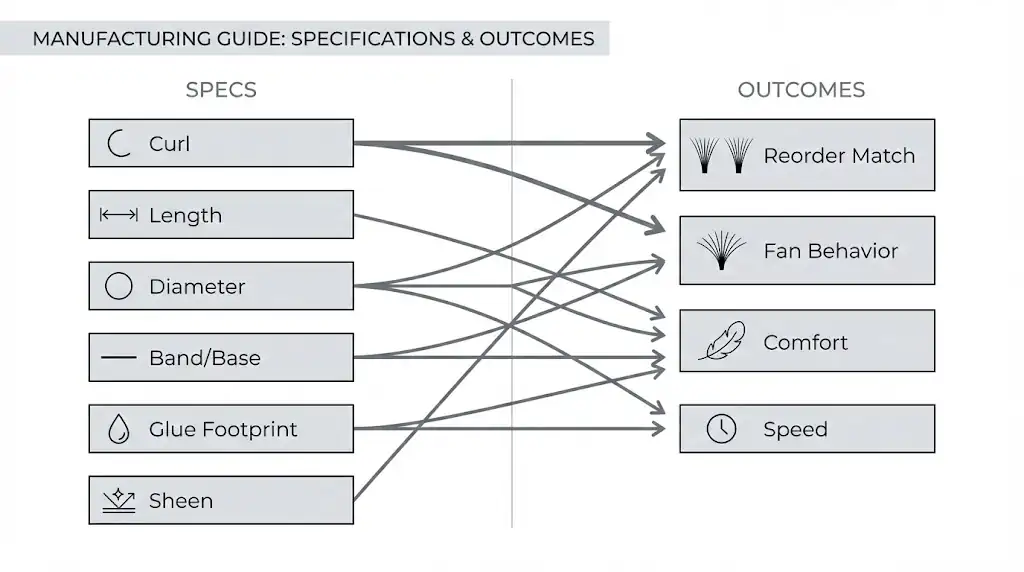
The tolerances that matter most (and why)
Below is a practical tolerance map we use in OEM/private label conversations. Treat these as typical working ranges, not universal rules—lash styles, fibers, curl processes, and packaging formats all change what’s realistic.
For more on standard curl types, diameters, lengths, and thicknesses, see our Eyelash Extension Sizes Guide.
QC tolerance guide (typical ranges)
| Feature | What it affects | Typical tolerance target | Notes / common failure mode |
|---|---|---|---|
| Length (mm) | Mapping accuracy, symmetry | ±0.3 to ±0.7 mm | Cutting drift creates “random spikes” in a tray/strip |
| Diameter (mm) | Softness, darkness, fan spread | ±0.003 to ±0.010 mm | Small shifts change weight + stiffness more than people expect |
| Curl (J/B/C/CC/D/L/M) | Style match, lift effect | Defined by gauge range, not letters | “C curl” varies across factories unless gauge-defined |
| Taper length / tip finish | Wispy look, realism | Visual standard + sampling | Blunt tips = heavier look; over-taper = fragile/“thin” look |
| Fiber sheen / color | Consistency on camera | Visual standard + delta limit | Batch dye variation shows up under bright/LED lighting |
| Strip band width/thickness | Comfort + adhesion | ±0.1–0.3 mm (band-dependent) | Too thick = stiff; too thin = twisting/warping |
| Premade fan base width | Easy pickup + clean wrap | ±0.2–0.5 mm | Wide base looks bulky; narrow base can split |
| Adhesive footprint (premade base) | Stickiness + neatness | Defined by max “glue dot” size | Excess glue creates hard base and uneven placement |
| Tray alignment / spacing | Fast picking + workflow | Visual standard + jig check | Misalignment slows artists and increases waste |
If you only tighten one spec, tighten curl definition first—because curl drift changes the entire look even when length and diameter stay “correct.”
Curl tolerance: why “C curl” isn’t a measurement by itself
Curl letters are labels, not units. In the lash market, “C curl” is often treated like a fixed standard—but in practice, different suppliers can label noticeably different radii/angles as “C,” which is why experienced buyers and techs see “C-to-CC” or “C-to-B” surprises when switching lots or factories.
The rule: a curl spec isn’t real until it includes a measurement method
A tolerance only holds if the measurement process is controlled (tool + method + environment + decision rule). That’s the logic behind measurement management standards (controlling measurement processes and confirming equipment suitability), not just “checking harder.”
And because every measurement has uncertainty, you’re always managing “acceptable range + method,” not just a single number.
What we recommend (and use)
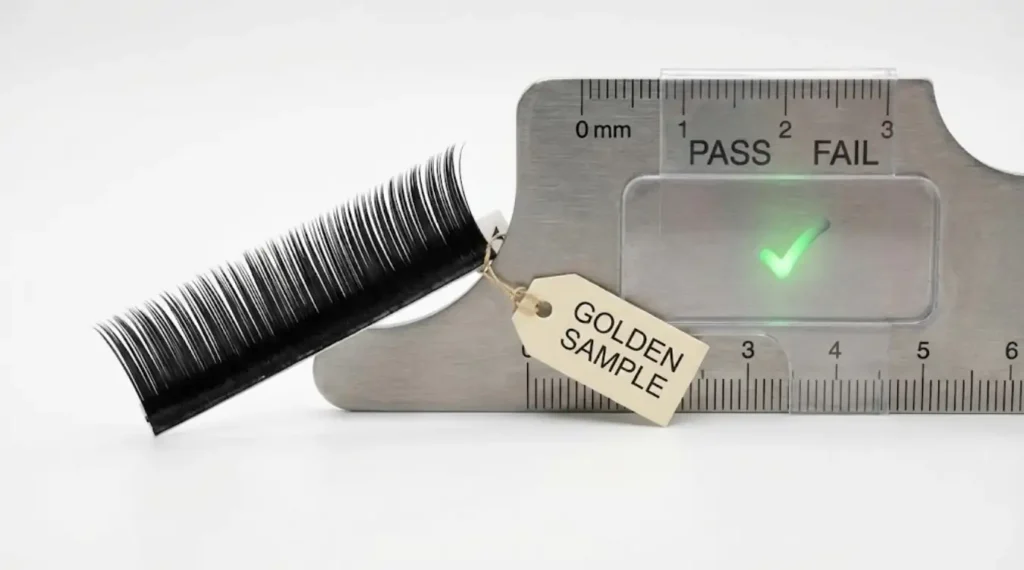
1) Define curl with a gauge range or a master (golden) sample—not the letter alone
Best option: Specify “C curl” as a pass/fail range on a curl gauge (or as an arc-angle/radius window), then lock that to a physical reference.
Copy/paste curl spec format (buyer-friendly):
- Curl name (marketing): C
- Curl definition (measurement): Must fall within Gauge Range ___ to ___ (or Arc angle ___° ± ___°)
- Inspection tool: Curl gauge model/ID: ___ (photo required)
- Decision rule: Pass if lash aligns to gauge within ___ mm gap (or within angle window)
- Sampling: n = ___ per lot / per tray / per row
This turns “C curl” from a word into a verifiable spec.
2) Inspect curl after conditioning, not right after heat-setting
Thermoplastic filaments (common in synthetic lash fibers) can relax/shrink/shift shape depending on heat history, time, tension, and environment—heat-setting exists specifically to improve dimensional stability and reduce unwanted curling/changes later.
So: measure curl after the product stabilizes under a consistent atmosphere, not “fresh off heat-set.”
Why we say this: multiple testing standards require conditioning to equilibrium before evaluation because humidity/temperature history changes measurable results.
Practical SOP (simple + repeatable):
- Condition trays/strips for X hours at agreed temperature/RH (choose one and keep it consistent)
- Measure using the same gauge + same placement method
- Record atmosphere + time + gauge ID on the inspection sheet
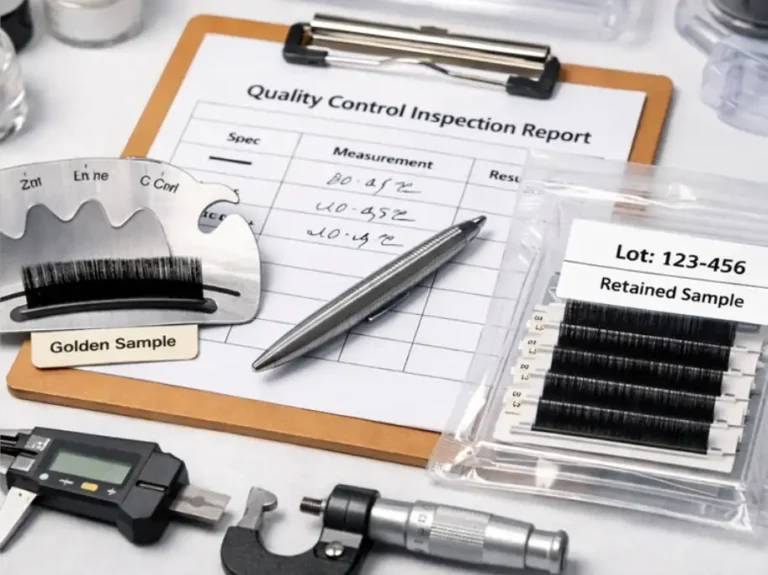
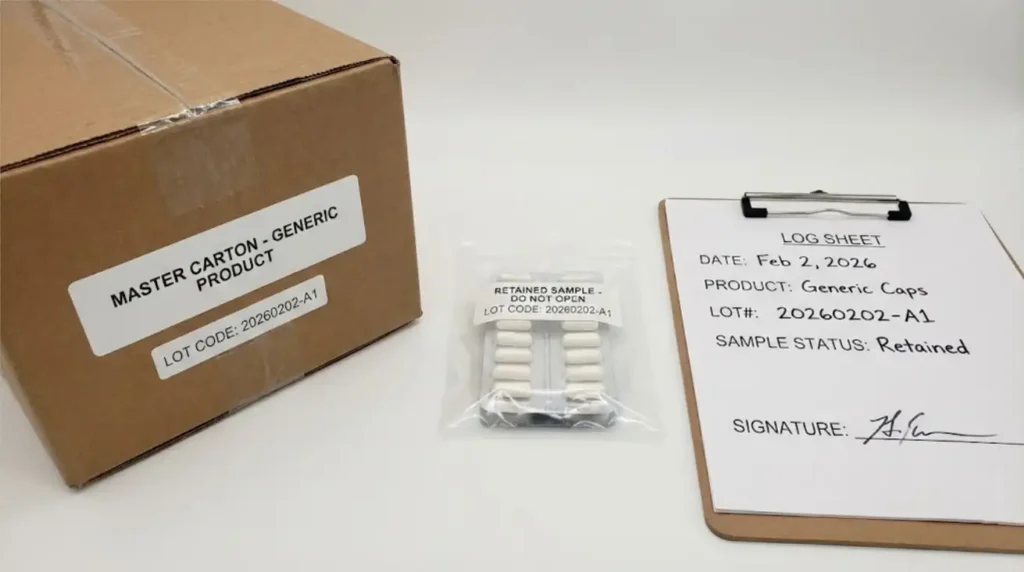
3) Keep retained samples from every lot (and label them for traceability)
When something “feels different,” retained samples let you compare lot-to-lot immediately—without guessing. This is common practice in high-control supply chains: PPAP-style documentation explicitly includes a “Master Sample – retained reference sample” concept for future benchmarking.
Minimum retained-sample setup:
- 1–2 trays/strips per lot, sealed + labeled
- Stored in controlled conditions
- Linked to lot code + production date + fiber batch
What to ask a manufacturer to show (not promise)
- A photo/video of the lash on the gauge + gauge ID (per lot)
- The written conditioning SOP (time/temp/RH) used before final curl sign-off
- The exact decision rule (what counts as pass/fail) and who signs it off
- Confirmation of retained samples + lot traceability (how long kept, how labeled)
Length & cutting tolerance: the invisible cause of “this tray is messy”
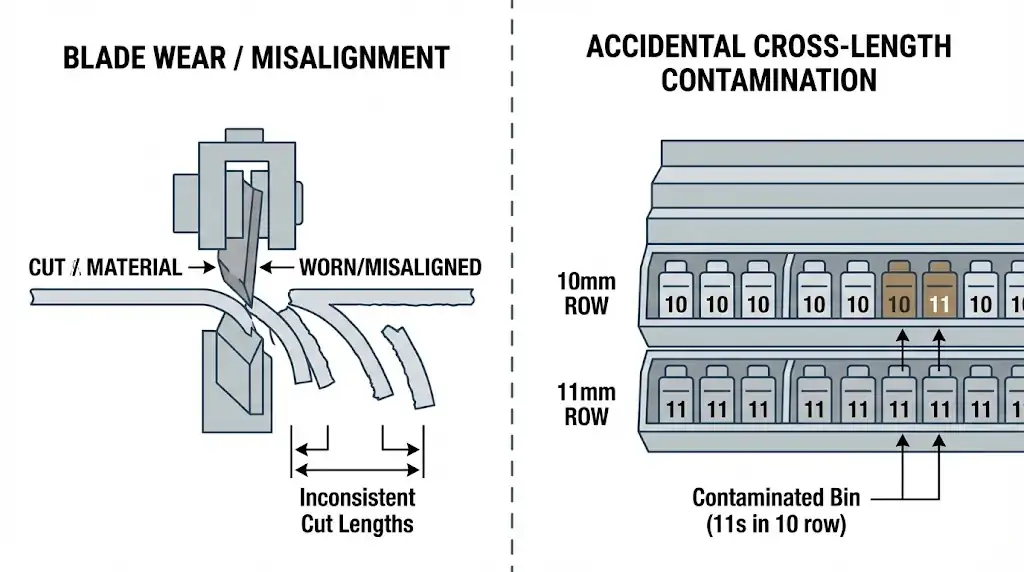
When a tray/strip looks “messy,” it’s usually not a sorting problem—it’s length control breaking somewhere upstream. The telltale sign is random spikes (a few lashes that look “too long” or “too short” inside an otherwise correct row).
The 3 root causes we see most
- Cutting blade wear or misalignment
- As blades wear, edges blunt and cutting behavior changes—wear patterns and blunt edges are a known driver of cut-quality problems in high-volume web/converting processes, and the same principle applies to precision fiber cutting (drift + inconsistent ends).
- Fiber tension differences during cutting
- If the fiber/web is held under different tension from one moment to the next, you can “cut the same setting” but get different results because the material isn’t behaving the same. In converting operations, inconsistent tension is explicitly linked to defects and dimensional variation risk (including width variation and alignment issues), which is why tension control is treated as a quality-critical parameter.
- Adjacent-length mixing (human + process)
- Even with perfect cutting, you can still get “11s in the 10 row” through bin mix-ups and weak changeover discipline. A formal line-clearance step (verifying the line is cleared of previous job’s components/WIP/labels and correctly set for the next run) exists specifically to prevent mix-ups.
How we control it (factory-side)
- First-piece approval (first-article / first-piece inspection)
Before a run scales, confirm the process can hit spec with documented measurements (not “looks fine”). First-article inspection is explicitly framed as validating/verifying a manufacturing process against requirements—including dimensional requirements—before full production. - Blade lifecycle + alignment checks (don’t “inspect in” accuracy later)
Track blade condition, replace on a schedule, and verify setup/alignment—because wear and setup changes are predictable sources of cut variation. - In-process sampling at a fixed interval (time-based or quantity-based)
Use simple SPC thinking: sample in time order and look for drift/special causes. Control charts are designed to routinely monitor quality over time and trigger investigation when signals indicate an assignable cause. - Measurement method discipline (tools + “same way every time”)
Reliable length control depends on measurement resources that are suitable for the method and produce valid results—this is a core quality-management expectation, not a “nice to have.” - Separation controls between adjacent lengths (bins, labels, clearance)
Physical separation + labeling + line clearance at changeover reduces the biggest real-world failure mode: mixing.
Copy/paste spec language
- Length definition + tolerance (per row): Target length ___ with tolerance ___ (state how length is measured).
- First-piece approval: Measured record required before run release.
- In-process checks: Sample every ___ units/minutes; record results; investigate drift signals.
- Mix-up prevention: Bins labeled + physical separation + documented line clearance at changeover.
- Tool + measurement control: Blade maintenance/replacement log + measuring resources controlled to ensure valid results.
Diameter tolerance: small number, big impact
“0.05 / 0.07 / 0.15” sounds like a precise spec, but in real production the fiber lot and the measurement method (tool, magnification, sampling size, and how “diameter” is defined) can shift what that number means in practice. Standards-based microscopy methods exist precisely because how you measure can change the result, and you need repeatability more than marketing precision.
Why tiny diameter drift shows up immediately (feel + pickup + “darkness”)
1) Feel / stiffness changes faster than people expect.
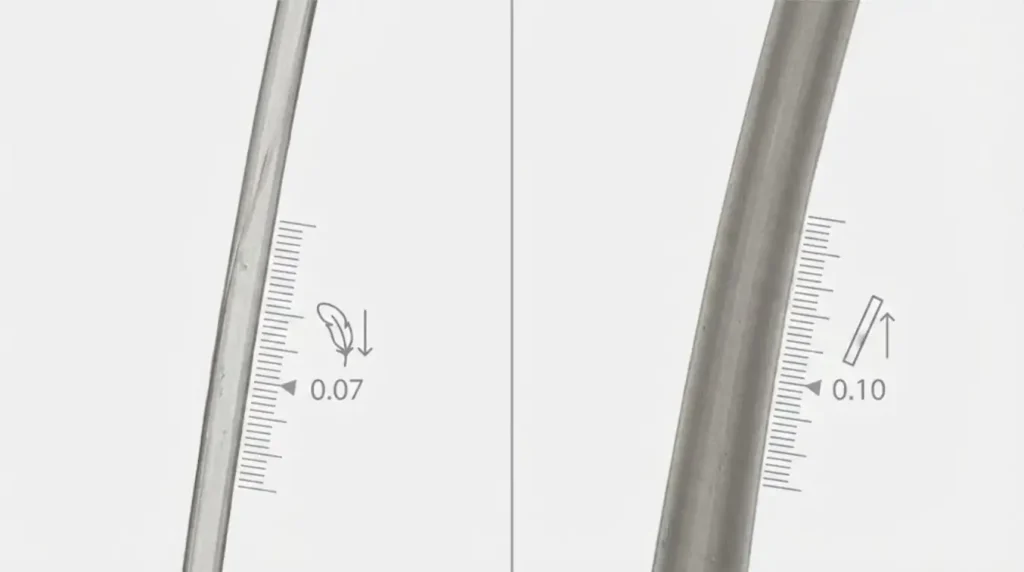
A lash fiber behaves like a slender beam: bending resistance depends on the material stiffness (E) and the cross-section geometry (second moment of area, I). For a round fiber, I scales with diameter⁴, meaning a small diameter increase can produce a disproportionately “stiffer / harsher” feel.
Example: if a “0.07” fiber drifts to 0.073 mm, that’s only ~4% thicker—but bending stiffness can jump by ~18% (all else equal).
2) Fan behavior (spread + snap) is sensitive to stiffness.
Stiffer fibers resist bending and separation differently during pickup and fanning, which is why diameter drift can change “fan opens easily” vs. “wants to stick / snap closed,” even if curl and length look correct. (Same underlying EI mechanics above.)
3) “Darkness” shifts because mass-per-length shifts.
In textiles, “fineness” is often tracked by linear density (mass per unit length—e.g., denier), because it is directly proportional to cross-sectional area for a uniform filament. That means thicker fibers typically carry more mass per length and can read visually “darker/heavier” at the same color.
How we QC diameter (so it’s verifiable, not vibes)
Incoming fiber (lot-to-lot consistency)
- Record fiber lot ID and verify fineness using a mass-per-length metric (e.g., denier/tex) as a fast screen for “this lot is heavier/thicker than last lot.”
- Spot-verify diameter by microscopy using a repeatable method (consistent magnification, sample prep, and pass/fail definition).
In-process spot checks (standardized tools + enough samples)
- Diameter measurement at high magnification can be operator-sensitive (focus, edge definition), and individual fibers vary—so you need enough measurements to get a stable estimate, not “3 fibers and a hope.”
- Use one agreed method/SOP (tool, lighting, how you pick fibers, how many you measure) so results are comparable over time.
Correlation check (diameter vs. weight-per-length)
- If measured diameter drifts but fineness doesn’t (or vice-versa), that’s a flag for method drift (tool/SOP) or material/cross-section differences—either way it’s a “stop and validate” moment.
The rule that prevents missed problems
Verify diameter tolerance using both:
- Direct measurement (tool-based microscopy under a repeatable method), and
- Functional check (a standardized fan/pickup/softness reference),
because either one alone can miss the real-world failure mode (measurement drift vs. “it behaves wrong on the tweezer”).
Diameter tolerance must be verified by (a) documented microscopy method + sample size per lot and (b) functional fan/pickup standard vs. retained reference; report both results with lot traceability.
Band/base tolerances: where comfort and “ease of use” live
For strip lashes, the band is the product’s backbone. For premade fans, the base is everything.
Explore examples in our collections:
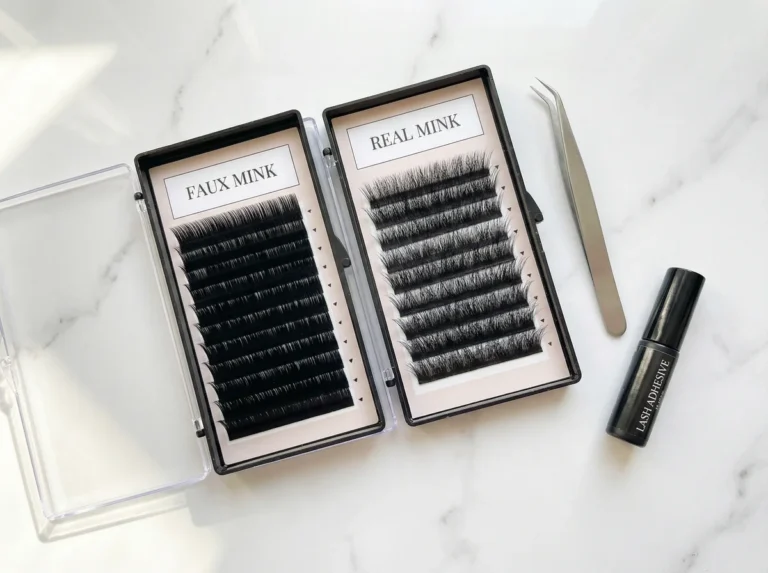
Strip lash band tolerances that matter
- Band thickness and stiffness: affects comfort and how well the strip follows the lash line
- Band width consistency: affects how “heavy” the base looks
- Warping/curving consistency: affects fit, especially at inner/outer corners
Premade fan base tolerances that matter
- Base width: controls bulk and placement precision
- Glue footprint: controls hardness and “bump” at the base
- Symmetry: affects uniformity across a set and speed of application
If you’re private labeling, we also recommend a packaging + band pairing discussion early: a premium tray can’t “save” a band that’s too stiff, and a soft band can be ruined by packaging that bends it.
Incoming materials QC: the easiest place to prevent downstream defects
Most visible defects start upstream. Incoming QC is where we catch:
- Fiber batch variation (sheen, color, diameter feel)
- Tray/packaging plastic brittleness or warp risk
- Adhesive consistency for premades (viscosity/appearance standard, if applicable)
- Label stock issues (smearing, color shift, barcode readability)
Factory insight #1 (info gain): We treat incoming materials as “spec multipliers.” If incoming fiber is slightly off, every downstream step has to overcompensate—raising scrap rate and increasing variation risk.
Factory insight #2 (info gain): We keep approved “golden samples” for fiber finish and color under controlled lighting. This prevents “looks fine in the warehouse” surprises that appear under salon LEDs or camera flash.
In-process QC: where tolerances are actually held
Final inspection can only sort good vs. bad. The real goal is to avoid making off-spec product in the first place.
What we check during production (examples)
- First-article inspection: confirm curl gauge, length, band/base standard before scaling
- Process drift checks: scheduled sampling every X units or minutes
- Tooling condition: blades, gauges, jigs, heat-setting parameters
- Line clearance: prevent mixing SKUs (especially adjacent lengths/curls)
Factory insight #3 (info gain): For highly customized styles (special curl blends, unusual tapers, mixed rows), the biggest QC risk is not “defects”—it’s mixing. We build QC around identity controls (labels, bins, step sign-offs), not just visual inspection.
Finished goods inspection: AQL, sampling, and what “pass” means
You’ll hear “we do 100% inspection” a lot. In reality, the more important questions are:
- What is inspected (which specs)?
- How is it measured (tool/standard)?
- What is the sampling plan (AQL or equivalent)?
- What happens when a lot fails (rework, rescreen, scrap)?
AQL in plain language
AQL (Acceptance Quality Limit) is a structured sampling approach that helps both sides define “acceptable risk” for defects. It’s common in manufacturing because it’s repeatable and auditable.
What we suggest for lash products:
- Define critical defects (wrong curl/length, obvious contamination, severe warping, label mismatch)
- Define major defects (noticeable inconsistency in density, base size out of range, poor alignment)
- Define minor defects (cosmetic packaging scuffs, tiny alignment shift)
Then agree on sampling size and acceptance criteria.
Consistency over time: curl retention, storage, and traceability
Even if a batch passes today, customers judge you by what arrives weeks later—and what reorders look like months later.
Controls that protect long-term consistency
- Conditioning: stabilize product before final measurement
- Packaging stress tests: does the tray/strip shift, bend, or compress in shipping?
- Retained samples: keep a reference from each lot for fast comparisons
- Lot traceability: connect finished goods back to fiber + production conditions
What “traceability” looks like in practice:
- Lot number on carton/master case
- Internal record tying lot to date, line, operators, and raw materials
- Retained tray/strip stored in controlled conditions
This is the difference between “we’ll investigate” and “we found the root cause.”
Quick checklist: what to lock into your spec sheet
Use this as a starting point when you’re building an OEM/private label QC plan.
- Define curl by gauge range or master sample (not letter only)
- Specify length tolerance per row and mixing limits between rows
- Specify diameter tolerance and confirm measurement method
- For strips: define band width/thickness and warp allowance
- For premades: define base width and max glue footprint
- Define visual standards (color, sheen, taper) under agreed lighting
- Agree on AQL sampling + defect classification (critical/major/minor)
- Require lot codes + retained samples for traceability
- Confirm packaging stress test expectations (carton drop/compression basics)
OEM/private label reality: tolerances vs. customization vs. MOQ (what changes, and how to manage it)
Customization (custom maps, special curls, unique fibers, premium packaging) helps you stand out—but it also increases product variety, which research consistently links to more operational complexity and, in many cases, worse quality conformance if controls don’t scale with variety.
Learn more about our OEM/ODM and Private Label Services.
Why “more SKUs” raises QC risk (and what to do about it)
When SKU count rises, the biggest failure mode often isn’t a “defect”—it’s a mix-up (wrong curl/length row, mislabeled tray, swapped components). ISO 9001 explicitly emphasizes identification and traceability as a way to ensure outputs remain conforming through production and delivery.
For cosmetics-adjacent manufacturing, ISO 22716 is the GMP reference that supports batch control and traceability expectations across production, control, storage, and shipment.
Practical identity controls that scale with SKU growth
- Positive ID at every handoff: row/length bins, curl racks, WIP trays, finished trays (barcode/QR or clear lot/SKU labeling).
- Line clearance between SKUs (remove previous labels/bins/materials before the next run) + sign-off checklist. (This is classic error-prevention / mistake-proofing.)
- Physical separation for adjacent lengths/curls (separate bins, color cues, dedicated work zones) to reduce “near-neighbor” mix errors.
Why “more custom materials” increases incoming QC (and cost/time)
Customization often means more fiber lots, band materials, adhesives, trays, and inserts—each new input adds another variable. Quality management standards expect controls over external inputs (supplier controls + verification).
Cosmetics GMP guidance commonly treats raw materials handling, receiving checks, documentation, and traceability as core risk controls.
And incoming quality control is a defined discipline precisely because external materials can drift from spec.
Minimum incoming QC upgrades as customization grows
- Approved supplier + material spec per component (fiber, dye/finish, band, tray plastic, adhesive).
- Receiving checks + lot capture (don’t lose traceability at the door).
- “Golden sample” comparison for visual materials (sheen/color/finish) and functional checks for performance materials (pickup, stiffness). (This aligns with “control” vs. only final sorting.)
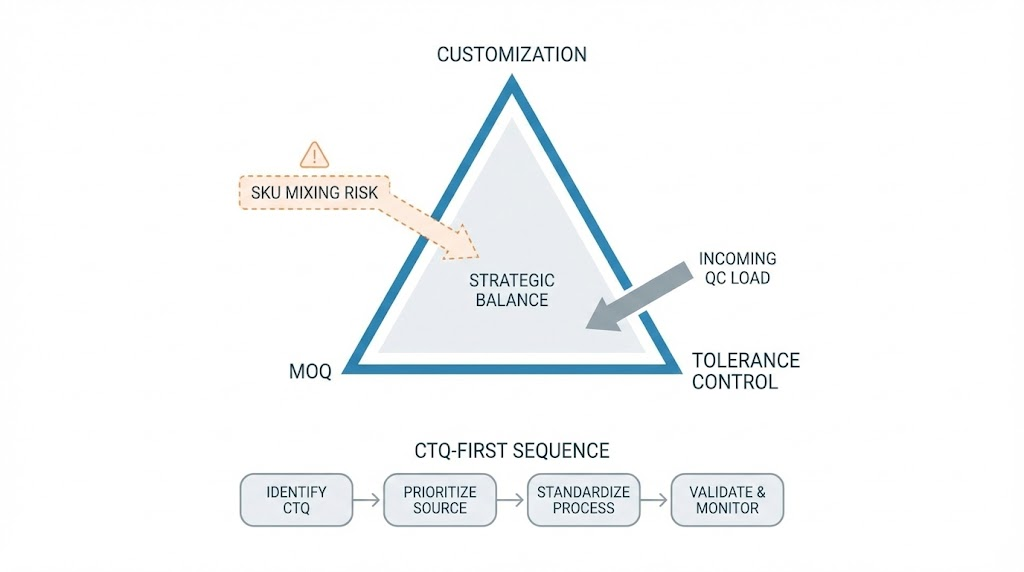
Low MOQ + high customization: totally possible, but prioritize the tolerances (CTQ-first)
With lower MOQ, you usually have shorter runs, more changeovers, and more variety, so trying to “tighten everything” is expensive and often unnecessary. A better strategy is to lock CTQs (Critical-to-Quality characteristics) first—i.e., the measurable specs that most directly drive customer satisfaction and repeat-order consistency.
Recommended sequence (fastest path to stable quality while you expand styles)
- Lock performance tolerances first (the “same set every time” drivers):
- curl, length, diameter, base/band → define how they’re measured + pass/fail.
(This is quality planning: define what matters, then build controls around it.)
- curl, length, diameter, base/band → define how they’re measured + pass/fail.
- Then lock visual standards (what drives perceived quality and brand look):
- sheen, taper, color → controlled lighting references + approved samples, plus incoming checks for material lots.
- Then optimize packaging + presentation (protect what you already made):
- Validate shipping/handling risk with a simple stress-test approach (drop/vibration/compression are standard hazards in recognized distribution tests).
Key Points
- Tolerances are only as real as the measurement method behind them.
- Curl definition is the fastest way to prevent “batch feels different” complaints.
- Length variation often comes from cutting + sorting controls, not just inspection.
- Diameter tolerance affects softness, darkness, and fan behavior more than most expect.
- Band/base tolerances decide comfort and application speed.
- Incoming QC prevents downstream variation and reduces scrap.
- In-process checks hold tolerances; final inspection mainly sorts outcomes.
- AQL sampling with clear defect categories beats vague “100% checked” claims.
- Retained samples + lot traceability make corrections fast and credible.
Conclusion
Quality control in lash manufacturing isn’t about chasing perfection—it’s about controlling the tolerances that customers actually notice, then proving consistency with repeatable methods: gauge-defined curl, row-by-row length control, diameter verification, band/base standards, AQL sampling, and traceability.
If you’re building or upgrading a private label line, we’re happy to help you translate “high quality” into a practical spec sheet—balancing customized lash styles, stable quality, low MOQ, and factory-direct pricing without overcomplicating production.
Explore our full product catalog or get a custom quote today.