

Pick the right box size, avoid dieline mistakes, and get packaging that protects curl, looks premium on camera, and runs smoothly in production.
Introduction
This guide shows how to choose a lash box size that fits your tray without crushing curl, and how to deliver a print-ready dieline your factory can run without rework. You’ll learn how to calculate internal dimensions (ID) from tray L×W×H + clearance, convert ID to outer dimensions (OD) using board thickness, and set realistic manufacturing tolerances for folding cartons vs rigid boxes.
You’ll also get the practical dieline requirements designers often miss—cut/crease lines, glue-free zones, 3mm bleed, and a 3mm safe zone—plus structure ranges (tuck-end, sleeve + tray, drawer, book-style) and insert rules that stop rattling and protect the lash curl apex.
Quick defaults: 3mm bleed + 3mm safe zone • side clearance +1–2.5mm each direction • top clearance +2–5mm • carton tolerance ±0.5–1.0mm.
Spec in 60 seconds (copy/paste)
Goal: The smallest box that fits your tray + insert with safe clearance—without touching the curl.
- Measure your tray (mm):
- Tray length (L), width (W), height at highest point (H)
- Pick clearance (starting defaults):
- Side clearance: +1.0 to +2.5 mm per side
- Top clearance: +2 to +5 mm (increase for tall curl or fluffy fibers)
- Calculate internal dimensions (ID):
- ID-L = Tray L + (2 × side clearance)
- ID-W = Tray W + (2 × side clearance)
- ID-H = Tray H + top clearance
- Estimate external dimensions (OD):
- OD ≈ ID + (2 × board thickness)
- Folding carton board thickness (typical): ~0.3–0.6 mm
- Rigid board thickness (typical): ~1.0–2.0+ mm
- Design with tolerance (do not skip):
- Folding cartons: ±0.5–1.0 mm
- Rigid boxes: ±1.0–2.0 mm (wrap + structure dependent)
One-line rule: If the lid can touch the curl apex during a shake/drop, you don’t have enough internal height or the insert isn’t controlling movement.
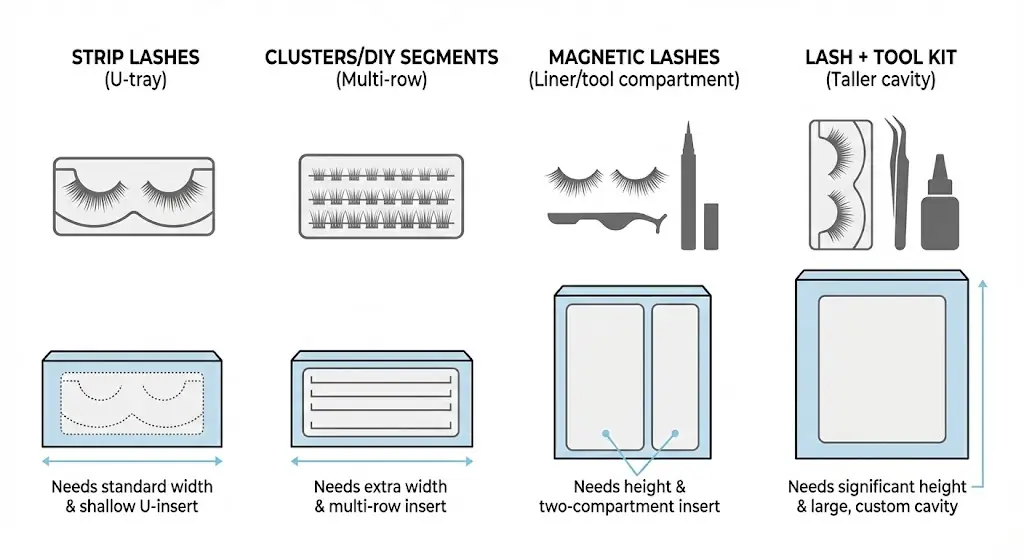
Start with what you’re boxing: formats that drive size
Before we talk “box size,” lock the product format, because it changes the insert and the internal clearance you need.
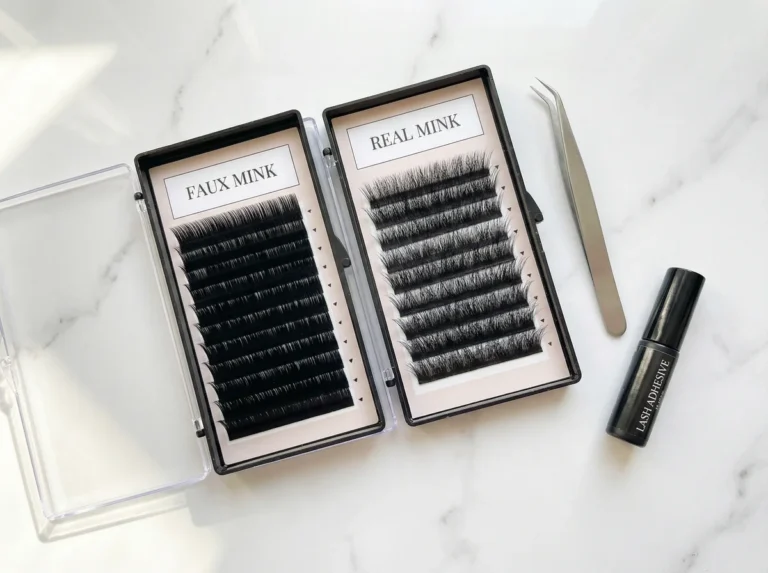
Strip lashes (most common)
- Usually a curved tray or “U” tray that protects curl.
- Needs side-to-side stability so the tray doesn’t slide and crush inner corners.
Clusters / DIY segments
- Often multiple rows; requires a wider viewing window or a taller inner cavity.
- Needs compartmenting (paperboard grid or thermoformed tray) to keep segments separated.
Magnetic lashes
- Typically paired with a magnetic liner or applicator → longer box or two-compartment insert.
“Lash + tool” kits (tweezers, brush, mini glue)
- Internal height matters more; consider drawer boxes or book-style structures for clean layout.
Action you can take: Put a ruler on your current tray and write down:
- tray outer length/width, 2) tray height (highest point), 3) lash curl height clearance you want above the lash line.
Those three numbers will save you multiple sampling rounds.
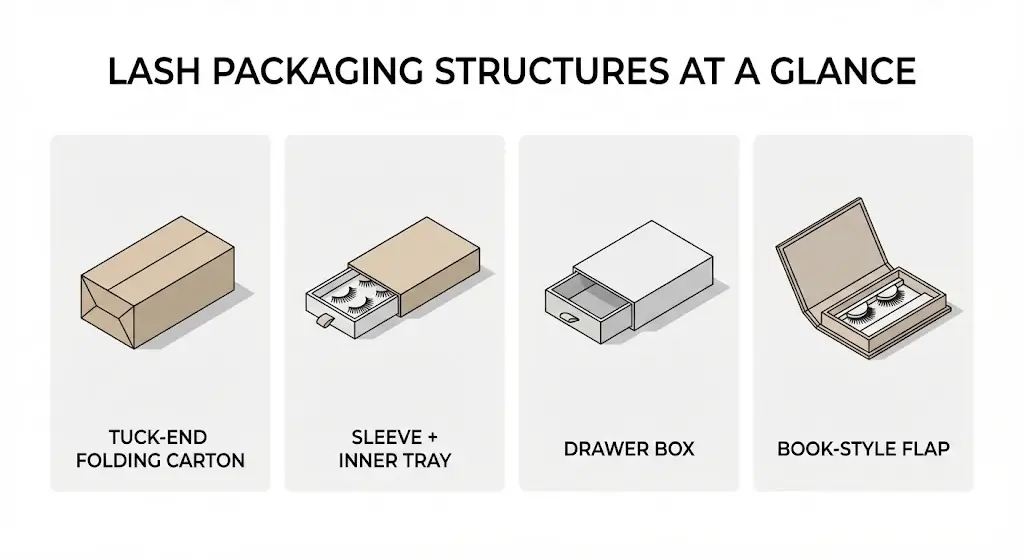
Common lash box size families (practical starting ranges)
There isn’t one global standard (different trays and markets vary), but in production we usually see these size families. Use them as starting points, then tailor to your tray.
Use these as starting footprints, then tailor to your tray + insert + clearance.
| Structure | Typical outer range (L×W×H) | Best for | Watch-outs (what breaks in production) |
|---|---|---|---|
| Single-pair folding carton (tuck-end) | ~110–125 × 55–70 × 18–25 mm | Most strip lash SKUs, ecommerce, low landed cost | Too shallow = lid rubs curl; too wide = tray slides/rattles |
| Sleeve + inner tray carton | Similar footprint; often slightly longer for pull space | Premium feel without rigid costs | Sleeve tolerance: too tight = scuffing; too loose = cheap feel |
| Drawer box (matchbox style) | ~115–130 × 60–75 × 20–30 mm | Premium unboxing, sets/kits, salon retail | Higher unit cost + more volume; drawer friction must be tuned |
| Book-style flap (magnetic or tuck flap) | ~120–150 × 70–90 × 20–35 mm | Storytelling layout, PR/influencers, magnetic kits | Magnet placement + board thickness alignment; needs structural QA |
| Rigid box (lid/base or rigid book) | Varies widely | High-ticket sets, strong shelf presence | Cost, lead complexity, storage/freight volume |
Quick rule (channel-based): If you’re mainly shipping ecommerce, stay compact with tuck-end or sleeve unless your AOV supports drawer/rigid.
How to calculate the “right” dimensions (internal vs external)
This is the part most brands skip—and it’s why boxes look great on screen but fail in real life.
Step 1: Define your internal cavity (ID)
Your internal dimensions should fit the tray + insert + clearance:
Internal length (ID-L) = tray L + side clearance
Internal width (ID-W) = tray W + side clearance
Internal height (ID-H) = tray highest point + top clearance
Practical clearance targets
- Side clearance: +1.0 to +2.5 mm each direction (depends on insert type)
- Top clearance: +2 to +5 mm (more if curl is tall or fibers are very fluffy)
If you use a rigid insert that locks the tray, you can keep clearance tighter. If you use a simple paperboard cradle, give more room.
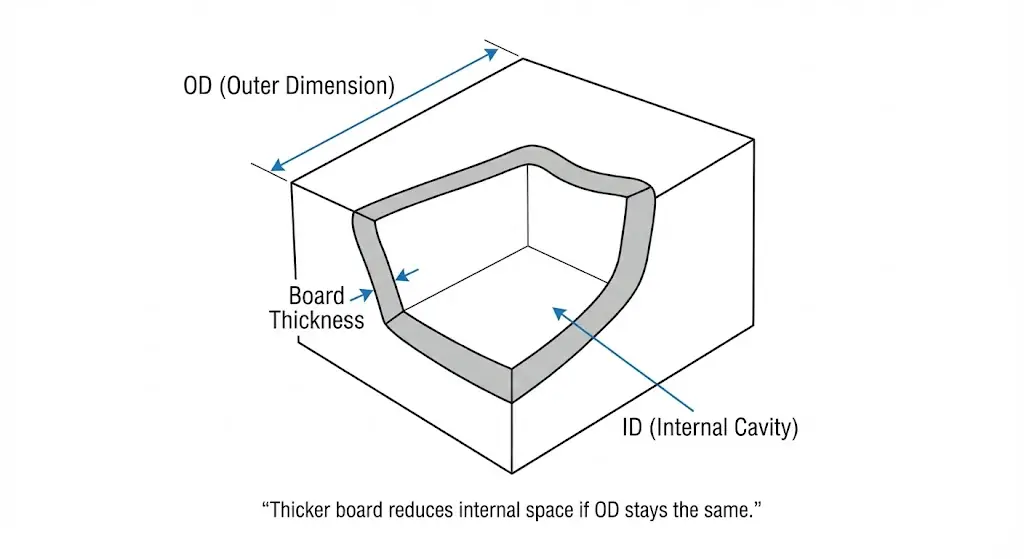
Step 2: Convert internal to external (OD) using material thickness
Paperboard has thickness (caliper). Thicker board = smaller internal cavity if you keep the same outside size.
A simple working estimate:
- Folding carton board: ~0.3–0.6 mm thickness (varies by gsm)
- Rigid board: often ~1.0–2.0+ mm
External size (OD) ≈ internal size + (2 × board thickness)
(And for some structures, folds add a bit more.)
Step 3: Add manufacturing tolerance
No factory hits “perfect” 100% of the time. Build tolerance into your spec.
We recommend:
- Folding cartons: allow ±0.5–1.0 mm tolerance
- Rigid boxes: allow ±1.0–2.0 mm tolerance depending on wrap and structure
Action you can take: Ask your supplier to confirm their standard tolerance and design your insert to “control” movement rather than relying on the box walls alone.
Worked example (real numbers you can model)
Tray measured: 118 × 58 × 12 mm (L×W×H at highest point)
Clearance chosen: side = 2.0 mm per side; top = 4.0 mm
Internal dimensions (ID):
- ID-L = 118 + (2 × 2) = 122 mm
- ID-W = 58 + (2 × 2) = 62 mm
- ID-H = 12 + 4 = 16 mm
Board thickness assumption: 0.5 mm folding carton
External dimensions (OD estimate):
- OD-L ≈ 122 + (2 × 0.5) = 123 mm
- OD-W ≈ 62 + (2 × 0.5) = 63 mm
- OD-H ≈ 16 + (2 × 0.5) = 17 mm
Tolerance target: ±0.8 mm (confirm your supplier standard)
Why this works: Side clearance prevents crushing corners, top clearance prevents curl contact, and tolerance prevents “perfect-on-screen, fails-in-real-life.”
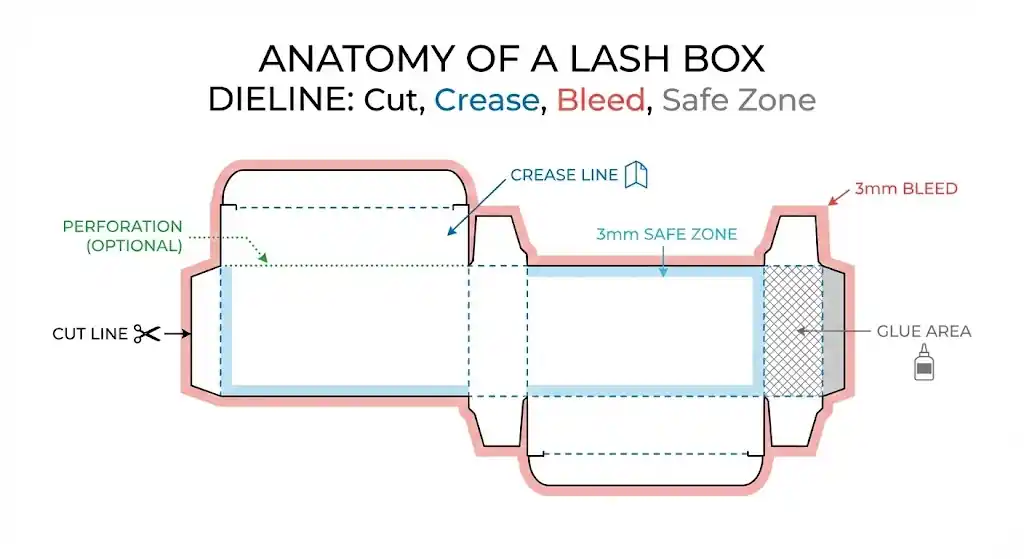
Dieline minimum (factory-ready) — what must be on the file
A dieline is only “production-ready” if it includes structure + print rules that prevent interpretation errors at the factory.
Must-have dieline layers (non-negotiable)
- CUT line (solid stroke, spot color, named e.g.,
CUT) - CREASE/FOLD line (dashed stroke, spot color, named e.g.,
CREASE) - PERF line if used (spot color
PERF) - GLUE zones clearly marked (and labeled NO FOIL / NO UV / NO VARNISH)
- BLEED area: default 3 mm
- SAFE zone: default 3 mm from trim (increase near creases if cracking risk)
- Panel labels: front / back / spine / glue flap (prevents mirrored artwork mistakes)
Print file setup (prevents “mystery errors”)
- Deliver print PDF (locked) + editable source file
- Fonts outlined, images embedded, 300 dpi at print size
- CMYK by default (Pantone only if you’re paying for spot inks)
- Special effects on separate spot layers (named exactly):
FOILSPOTUVEMBOSS/DEBOSS
- Version naming:
SKU_BoxType_Size_V#_YYYY-MM-DD
Practical defaults (safe starting point)
- Bleed: 3 mm
- Safe zone: 3 mm (keep text/logos further from creases)
- Barcode: preserve quiet zone (don’t crowd with patterns)
One-line rule: If the factory has to guess what a line means, you’ll pay for it in rework.
Choosing the right structure (and how it affects dielines)
Tuck-end folding carton (straight tuck / reverse tuck)
Why we like it: lowest MOQ-friendly option, fast to produce, efficient freight.
Dieline tip: glue flap width matters; too narrow = popping seams, too wide = wasted material.
Sleeve (outer) + inner tray
Why we like it: premium feel without full rigid cost.
Dieline tip: sleeve needs a tested tolerance. Add a small “finger notch” or pull ribbon if it’s tight.
Drawer box
Why we like it: great for sets and a tidy unboxing moment.
Dieline tip: drawer friction is the whole experience—design for a smooth pull, not a wrestling match.
Book-style flap (magnetic or tuck flap)
Why we like it: clean storytelling layout for private label brands.
Dieline tip: magnets + thick board need precise placement layers and clearance so panels align.
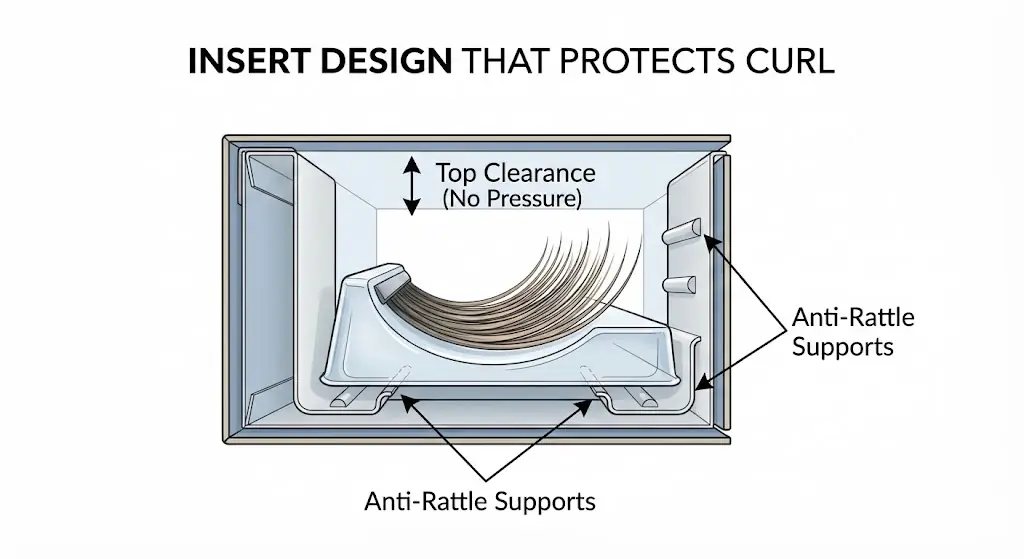
Insert engineering: protect curl, stop rattling, speed up packing
A beautiful box that doesn’t protect the lash shape will get returns—fast.
Insert options we see most
- Thermoformed PET tray: stable, crisp, great visibility
- Paperboard cradle: eco-friendly feel, good for cost control
- EVA/foam insert: premium but can add cost and dust issues
- Card slots / tabs: simple, but must be tested to avoid tray popping out
Practical rules for inserts
- Control movement at 2–4 points (not just one tight edge)
- Keep pressure off the lash band and curl apex
- Add a pull notch so customers don’t dig nails into fibers
- If you include a mirror, keep it away from lash tips to avoid rubbing
Packing workflow tip: If you’re a salon retailer or wholesaler, choose an insert that’s fast to load. Seconds matter at scale.
Print & finishing specs that survive real handling
Pretty finishes can turn ugly if you don’t spec them for scuff resistance.
Our “safe premium” finish stack
- Matte lamination (or light soft-touch)
- One hero effect: either small foil logo or spot UV (not both at first)
Why: matte photographs premium, lamination protects ink, and one hero effect keeps failure risk low.
Common finishing pitfalls
- Foil on creases: cracks and flakes
- Spot UV too large: looks wavy or uneven on textured stock
- Soft-touch only (no lamination): fingerprints and scuffs
Color expectations (keep it honest)
Even with good factories, color can shift slightly between runs. Control it by:
- Approving a physical proof when color matters
- Using Pantone only where critical (logos, signature tones)
- Avoiding ultra-dark solid coverage on cheap board (shows scratches)
One-page OEM packaging spec sheet (copy/paste template)
Use this when requesting quotes or starting production. It prevents vague “make it premium” briefs.
Product format: (strip / cluster / magnetic / kit)
Tray size (mm): L ___ × W ___ × H ___ (highest point)
Clearance target: side ___ mm per side; top ___ mm
Box structure: (tuck-end / sleeve+tray / drawer / book-style / rigid)
Dimensions
- Internal (ID): L ___ × W ___ × H ___ mm
- External (OD target): L ___ × W ___ × H ___ mm
- Tolerance: ± ___ mm (confirm supplier standard)
Insert
- Insert type: (PET tray / paperboard cradle / EVA / tabs/slots)
- Lock points: (2–4 points controlling movement—describe where)
- Protection notes: keep pressure off lash band + curl apex, add pull notch
Materials & print
- Board/material: ___ gsm or ___ mm thickness
- Print: CMYK (Pantone: ___ if needed)
- Finish: matte lamination / soft-touch / foil / spot UV (choose 1 hero effect to start)
- Glue-free zones: (mark on dieline: no foil/UV/varnish)
Production & pack-out
- QC checkpoints: fit check, scuff resistance, curl clearance shake testworks from the same technical target, not vague “make it premium.”
- Proof required: (yes/no) + notes for dark solids/brand colors
- Drop/handling expectation: ecommerce / retail / PR mailer
- Units per master carton: ___ (affects freight)
OEM / private label packaging workflow (lowest-risk path from spec → mass production)
If you’re doing OEM/private label lashes with custom packaging, the cleanest workflow is a simple stage-gate process: lock inputs early, prototype fast, then scale with documented QC.
Stage 0 — Lock inputs (so sizing doesn’t drift)
You provide:
- Lash format (strip / cluster / magnetic / kit)
- Tray outer L×W×H + photos (top + side)
- Target channel (ecom vs retail vs PR) + any shipping constraints (mailers, bundles)
Output: a frozen “fit spec” you and the factory both work from (this alone prevents most rework).
Stage 1 — Choose structure + size family (based on channel)
We match a box structure + size family to your channel:
- Ecommerce: compact tuck-end or sleeve + tray (usually best for CTR + freight)
- Retail: stronger shelf face, barcode placement, scuff resistance
- PR / influencer: book-style / drawer if the unboxing moment matters
Output: one recommended structure + 1 fallback option (so you’re never stuck).
Stage 2 — Dieline + artwork preflight (print-ready, not “looks right”)
Dieline is created/confirmed (we can work with your designer or provide one), including:
- Cut/crease lines, glue zones, panel labels, bleed/safe zones
- Barcode placement rules (leave proper quiet zone)
- Exported print PDF + editable source file (versioned)
Output: “approved for sampling” dieline package, not just an outline.
Stage 3 — Sampling (fit + curl protection + handling reality)
We check a sample pack for:
- Fit & rattle control (tray doesn’t slide)
- Curl clearance (lid doesn’t rub lash tips)
- Finish durability (scuffing, fingerprints, foil/UV behavior)
- If you ship parcels, consider a basic transit test plan aligned to common packaging test procedures used for parcel delivery systems
Output: pass/fail notes + the exact change list (so the next sample is the last one).
Stage 4 — Mass production with defined QC checkpoints
Before scaling, define what “acceptable” means and how you’ll inspect it:
- Incoming materials (board, inserts, magnets/window film)
- In-process checks (glue strength, squareness, color shift, scuff)
- Final inspection using a sampling plan (many factories reference AQL / lot-by-lot attribute inspection schemes like ISO 2859-1)
- Pack-out verification (master carton count, corner crush protection, barcode scan)
Output: fewer surprises at scale, and faster reorders.
Low-risk scaling tip (MOQs + upgrades)
If you’re trying to keep risk low, start with a structure that supports low MOQ and stable production (often a premium folding carton + reliable insert), then upgrade finishes (foil/spot UV/soft-touch) only after the SKU proves demand.
Quick checklist: lash box sizing & dielines (copy/paste)
- Tray outer L/W/H measured + photos from top and side
- Internal clearance defined (side + top)
- Structure chosen (tuck-end / sleeve / drawer / book / rigid)
- Insert chosen (PET / paperboard / EVA) and how it locks the tray
- Dieline includes cut/crease/perf + glue zones + panel labels
- Bleed 3 mm; safe zone 3 mm; keep effects off creases
- Artwork: CMYK, fonts outlined, 300 dpi images, effect layers named
- Proof approved (especially for dark solids and brand colors)
- Drop/handling expectations shared (ecommerce vs retail)
Common mistakes & fixes (production-backed)
Mistake 1: “We designed the outside size first.”
What you’ll see
- Tray slides, corners get crushed, lid rubs curl, or the box “feels empty” even if it looks fine on screen.
Why it happens
- The outside dimensions (OD) ignore what really determines fit: tray + insert + clearance + material behavior. Packaging guidance consistently emphasizes starting from inner dimensions and allowing for production variation (e.g., gluing/finishing can shift fit).
Fix (do this every time)
- Lock the internal cavity (ID) first
- ID-L = tray L + (2 × side clearance)
- ID-W = tray W + (2 × side clearance)
- ID-H = tray H + top clearance
- Convert to OD with board thickness and structure rules.
- Account for fold/crease behavior (tiny shifts add up). Many carton print specs explicitly call out rollover allowance and minimum safe distances from crease/trim to prevent visual/fit surprises.
Prevention (fast check)
- Request a white sample and do a 10-second shake test: if the tray moves freely, your “fit system” is the wrong part (box walls instead of insert/locking points).
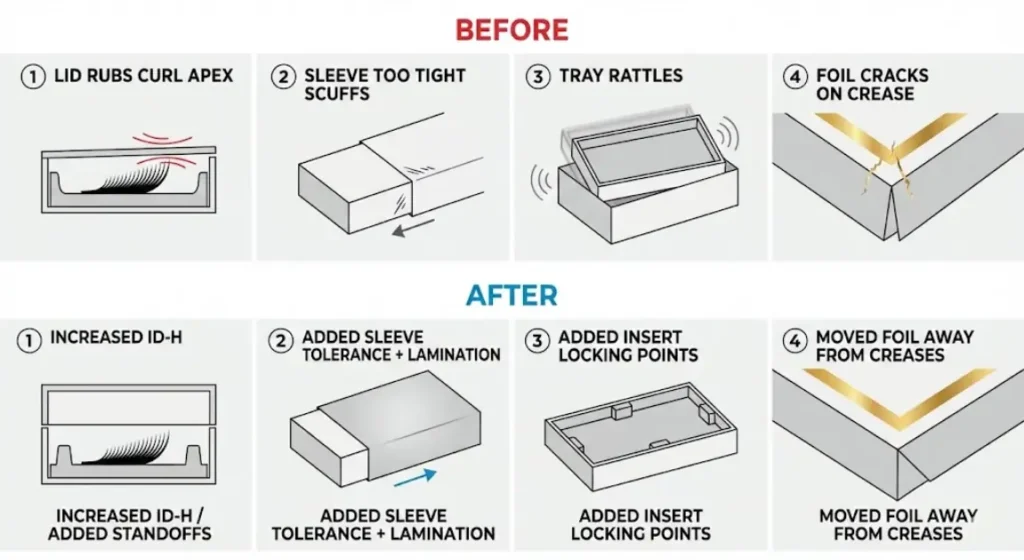
Mistake 2: Lash tips rub the lid and lose curl.
What you’ll see
- Lashes arrive “tired,” tips look flattened, curl apex gets brushed or compressed.
Why it happens
- Insufficient internal height or an insert that applies pressure to the lash curl apex instead of supporting the tray edges.
Fix
- Increase ID-H (internal height) or redesign the insert so contact happens on tray edges / perimeter, not on the lash curl line.
- Add top standoffs or edge rails (PET ribs / paperboard ledges) so the lid cannot touch the lashes even if the carton flexes.
Prevention
- Define a minimum top clearance in your spec (e.g., “top clearance must remain after closing + shipping compression”) and verify with a closed-box press test (light pressure on lid corners).
Mistake 3: Foil cracks on fold lines.
What you’ll see
- Metallic foil (and sometimes spot UV) looks chipped or fractured exactly along creases.
Why it happens
- Foil/UV applied across folds experiences stress when the carton is creased/folded; print-embellishment guidance specifically warns that foil and spot UV can crack when placed over folded/creased areas.
- Research on carton converting also shows that creasing/scoring choices affect folding performance, which is why folds are a high-risk zone for brittle finishes.
Fix
- Keep foil (and spot UV) off crease lines; treat folds like a “no-embellishment zone.”
- Reduce foil to a smaller hero mark (logo, monogram) instead of large blocks.
- Ensure foil is delivered as a separate spot layer so prepress can manage it cleanly.
Prevention
- Add one line to your dieline notes: “No foil/UV over folds or creases.” (Factories take that seriously because it reduces rework risk.)
Mistake 4: Sleeve is too tight and scuffs.
What you’ll see
- Sleeve feels premium on day one… then rub marks, ink burnish, edge whitening, and scuffing appear during packing and transit.
Why it happens
- Tight sleeves create constant friction. Testing/finishing literature notes that certain substrates (especially matte surfaces) are prone to marking, scuffing, and rubbing during post-print handling and transportation.
- Packaging finishing guides also frame coatings/finishes as protection as much as aesthetics.
Fix
- Add real tolerance to sleeve sizing (don’t rely on “perfect” die-cut + perfect glue every run).
- Use matte lamination (or a scuff-resistant finish) for ecommerce-heavy brands where cartons rub each other in master cases.
- If the sleeve must be snug, add a finger notch / pull ribbon so customers don’t grind the sleeve off.
Prevention
- Do a carton-to-carton rub test (10–20 rubs) on the first proof/finish sample and decide if you need lamination before scaling.
Mistake 5: The tray rattles inside the box.
What you’ll see
- Product shifts in transit, lashes rotate, inner corners crush, “cheap” sound on shake.
Why it happens
- Clearance was added, but movement wasn’t controlled—you gave space without adding locking geometry. Inserts are specifically used to prevent products from moving and to stabilize presentation.
Fix
- Add 2–4 locking points instead of shrinking the whole box:
- paperboard corner cradles
- PET tray ribs
- tabs/slots that capture the tray edges
- Keep clearance realistic, but make the insert do the controlling.
Prevention
- Write one spec line: “Tray must not translate > 1–2 mm under shake test.” It forces the supplier to solve the problem structurally.
Mini QC you can add to every sampling round (30 seconds)
- Scuff check: rub 10–20 times; if it marks, upgrade finish/tolerance.
- Shake test: no audible rattle, tray movement minimal.
- Lid clearance: no contact with curl apex under light corner press.
- Fold-line check: no foil/UV crossing creases.
Mini glossary (fast definitions)
- ID (Internal Dimensions): The usable internal cavity size your tray/insert must fit.
- OD (Outer/External Dimensions): The outside box size used for freight, shelving, and visual footprint.
- Caliper / board thickness: Material thickness (mm). Thicker board reduces internal space if OD stays the same.
- Curl apex: The highest point of the lash curl—this must never touch the lid during handling.
- Dieline: The structural template showing cut/crease/perf and print boundaries (bleed/safe zones).
- Glue flap: The panel that gets glued during assembly—must be marked and kept free of special finishes.
- Tolerance: The allowed variation (mm) in production—packaging is not precision-machined.
FAQ
What’s the “best” lash box size?
The best size is the smallest one that fits your tray + insert with safe clearance. Smaller usually wins on freight and shelf cleanliness—until it starts crushing curl.
Should we design around a standard tray?
If you’re early-stage or testing SKUs, yes—standardizing tray footprints can cut tooling and simplify reorders. If you’re building a signature look, custom trays can be worth it.
How much bleed and safe area should we use?
If you don’t have a printer spec yet, 3 mm bleed + 3 mm safe zone is a reliable default for folding cartons.
Is rigid packaging worth it for lashes?
It can be—if your brand positioning and price support it. If you’re scaling fast, a premium folding carton often gives the best margin-to-look ratio.
Can you help with dielines and packaging under private label?
Yes. As a manufacturer, we can support packaging structures, dielines, inserts, and QC checkpoints alongside lash production—especially when you want stable quality, low MOQ options, and consistent reorders.
Key Points (scannable)
- We always size from tray + insert + clearance, not from “pretty outside dimensions.”
- Use internal dimensions (ID) first, then convert to external (OD) using board thickness.
- Build in tolerance: cartons and rigid boxes are not precision-machined parts.
- A proper dieline must include cut/crease/perf, glue zones, bleed, safe zones, and labeled panels.
- Keep foil/spot UV away from creases to prevent cracking and ugly wear.
- Inserts matter as much as the box—your job is to protect curl and stop movement.
- For most brands, matte lamination + one hero effect is the safest “premium” start.
- Standardizing tray footprints can reduce cost and speed up future SKU launches.
If you want, tell us what you’re packaging (single strip / cluster / magnetic / kit) and your tray dimensions (L×W×H). We’ll suggest a box size family + structure that’s compact, photo-friendly, and easy to manufacture under OEM/private label.
Reference
1) ISO 15930-1 (PDF/X-1 & PDF/X-1a)
2) ISO 12647-2 (CMYK offset process control)
3) Pantone spot vs process color
4) GS1 General Specifications (standards page)
5) GS1 UK quiet zone explainer
6) ISO/IEC 15416 (barcode print quality)
7) ISO 2859-1 (AQL sampling plans)
8) ASTM D4169 (shipping container/system performance testing)
9) ISTA test procedures (incl. 3A)
10) ASTM D5264 (rub resistance / Sutherland):
11) ECMA Codes (folding carton codes PDF)
12) FEFCO code (official page)
13) 3mm bleed + safe zone guide (printer PDF)
14) Dieline design tips (practical guide):
15) Caliper vs GSM (paperboard thickness vs weight)