
Learn wispy (Kim K/wet set) lash extensions with a clear lash map: where to place spikes, best lengths/curls, and classic vs hybrid vs volume tips for lash artists.
In this guide, you’ll learn which clients suit wispy sets, the difference between classic vs hybrid vs volume wispy, and the lash map + spike placement rules to recreate the look consistently.
- Best for: sparse lash lines, small eyes, clients wanting texture (not a uniform strip look)
- Spikes: typically 2–3mm longer than the main layer, placed in a repeating pattern
- Main layer: classic singles or 2–6D fans depending on type
- Longevity: commonly 2–3 weeks before a fill is needed (varies by lash cycle/care)

Wispy vs Wet Set vs Kim K vs Anime Lashes (What’s the difference?)
| Style | Main visual | How it’s built | Best for | Common query it answers |
|---|---|---|---|---|
| Wispy | airy texture + spikes | mixed lengths + spikes + base layer | most clients; soft drama | “what are wispy lashes” |
| Kim K | wispy with signature spike pattern | similar to wispy, often more defined spikes | clients wanting “celebrity” texture | “Kim K lashes meaning” |
| Wet Set | glossy, “wet mascara” look | closed fans / narrow spikes; strong shine | clients who like bolder definition | “wet set lashes vs wispy” |
| Anime / Manga | separated, doll-like spikes | dramatic spike grouping; strong contrast | niche dramatic looks | “anime lashes vs wispy” |
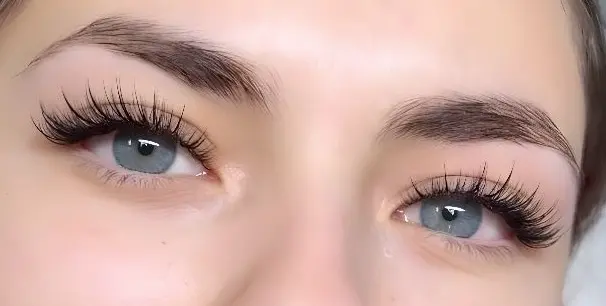
What are wispy lash extensions?
Wispy lash extensions are a textured lash extension style created by mixing multiple lash lengths and placing a few longer “spikes” along the lash line for a soft, airy finish. Instead of looking perfectly uniform, a wispy set has intentional peaks and layers that add definition without feeling heavy. This look is sometimes described as Kim K–inspired or a wet-look variation, depending on the spike density and base layer.
In practice, the wispy effect comes from contrast: spikes are typically 2–3 mm longer than the base layer, and the rest of the lashes are filled in to keep the set balanced.

Who should get wispy lash extensions?
Wispy lash extensions are versatile, but they work especially well for clients who want texture (spikes + soft layers) rather than a perfectly uniform finish.
- Sparse lash lines / gaps: A wispy set can create the look of a fuller lash line by combining a lighter base layer with strategically placed spikes—without looking heavy.
- Small or slightly hooded eyes: Gradual length changes (and controlled peaks) can visually open the eyes and give a more lifted appearance.
- Wide-set eyes: By placing the longest points a bit more toward the center (instead of pulling everything outward), a wispy map can help the eyes look more balanced.
- Clients who want “noticeable but airy”: Wispy is ideal for people who want a dramatic, fluttery look with visible texture—not a solid “block” of volume.
During consultation, adjust spike placement and base density to match the client’s natural lash strength and desired intensity—small mapping changes can make the look softer, more dramatic, or better suited to different eye shapes.
Not ideal for: Clients with very weak or damaged natural lashes may need a lighter base (shorter lengths / lower density) or a different style until lash health improves.
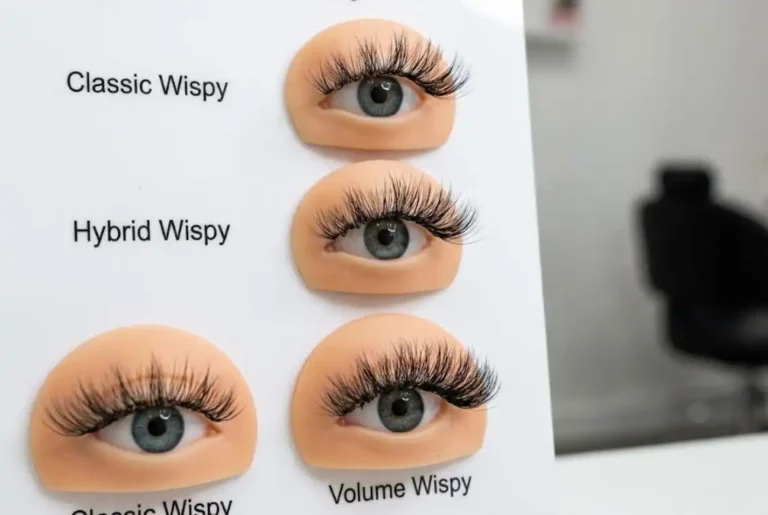
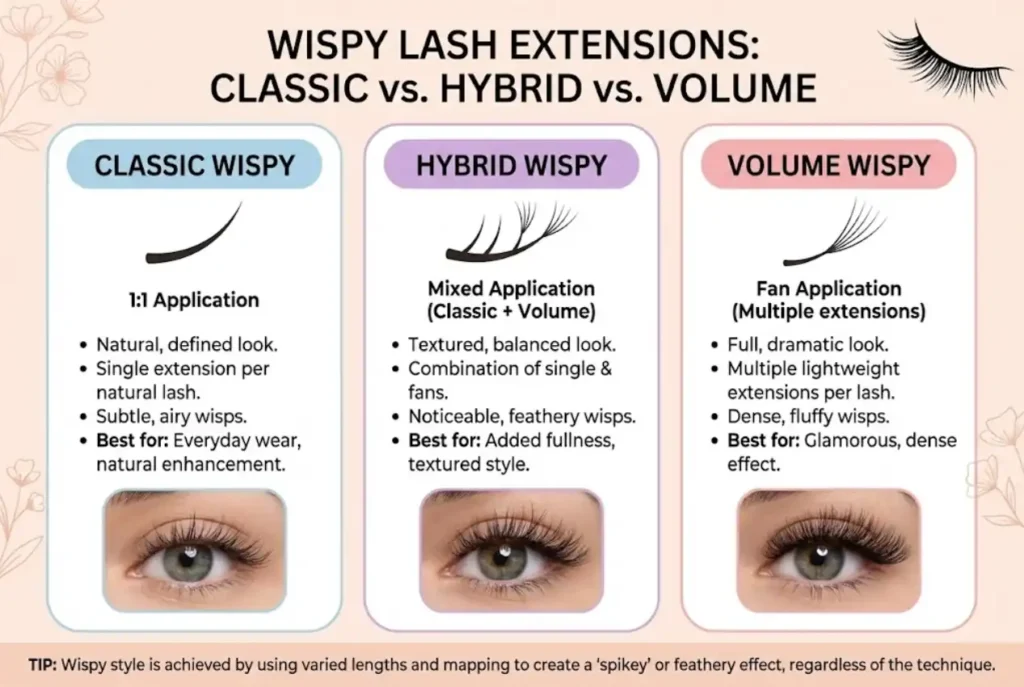
Types of wispy lash sets (Classic, Volume, Hybrid) + how they’re made
There are three common ways to create a wispy look: Classic, Volume, and Hybrid. The “wispy effect” comes from intentional length variation + spikes. The main difference between the three styles is the base layer (single lashes, fans, or a mix), which changes the density, texture, and level of drama.
Quick comparison
| Style | Base layer | Spike method | Best for | Overall finish |
|---|---|---|---|---|
| Classic Wispy | Single extensions | Longer single lashes as spikes | Natural + textured definition | Light, airy, “mascara” vibe |
| Volume Wispy | Narrow/closed fans | Spikes made from closed fans or singles | Fuller look with fluffy texture | Feathery + dramatic |
| Hybrid Wispy | Mix of singles + fans | Singles (or narrow fans) as spikes | Balanced: definition + softness | Textured with medium fullness |
Classic wispy set
What it is: A classic wispy set uses single extensions with planned length changes. Spikes are created by placing a few longer singles at specific points along the lash line.
- Best for: clients who want a noticeable style that still looks natural
- Base layer: single lashes (short-to-medium lengths)
- Spikes: longer singles placed evenly to create texture
- Finish: clean definition with soft “peaks”
Mapping note: Keep spikes consistent and avoid clustering them too close together—spacing is what makes the texture look intentional.

Photo credit: @She_lash
Volume wispy set
What it is: A volume wispy set uses narrow or closed fans for the base layer, then adds spikes to create the signature wispy “peaks.” This version looks fuller while still keeping a light, fluttery texture.
- Best for: clients who want a fluffier look (or need more density along the lash line)
- Base layer: fans placed to build softness and fullness
- Spikes: closed fans or longer singles for clean peaks
- Finish: feathery and more dramatic than classic
Mapping note: Build the base layer first for density, then add spikes on top as “high points” so they stay visible.

Photo credit: @glitzlashstudio
Hybrid wispy set
What it is: A hybrid wispy set combines single lashes + fans. Many artists use singles for spikes and fans between them to create a balanced look with both definition and softness.
- Best for: clients who want texture without going full volume
- Base layer: fans for softness + singles for definition
- Spikes: longer singles (or narrow fans) to create the peaks
- Finish: textured, dimensional, medium fullness
Mapping note: Keep spikes consistent in height (e.g., 2–3 mm above the base layer) so the set looks polished, not messy.

Photo credit: @lashbyarmy
Which one should you choose?
- Choose Classic if the client wants definition with a light finish.
- Choose Volume if the client wants fluffier density with wispy texture.
- Choose Hybrid if the client wants a balanced look—noticeable but not too heavy.
Next, let’s break down the exact mapping and spike placement so you can build any of these styles step-by-step.
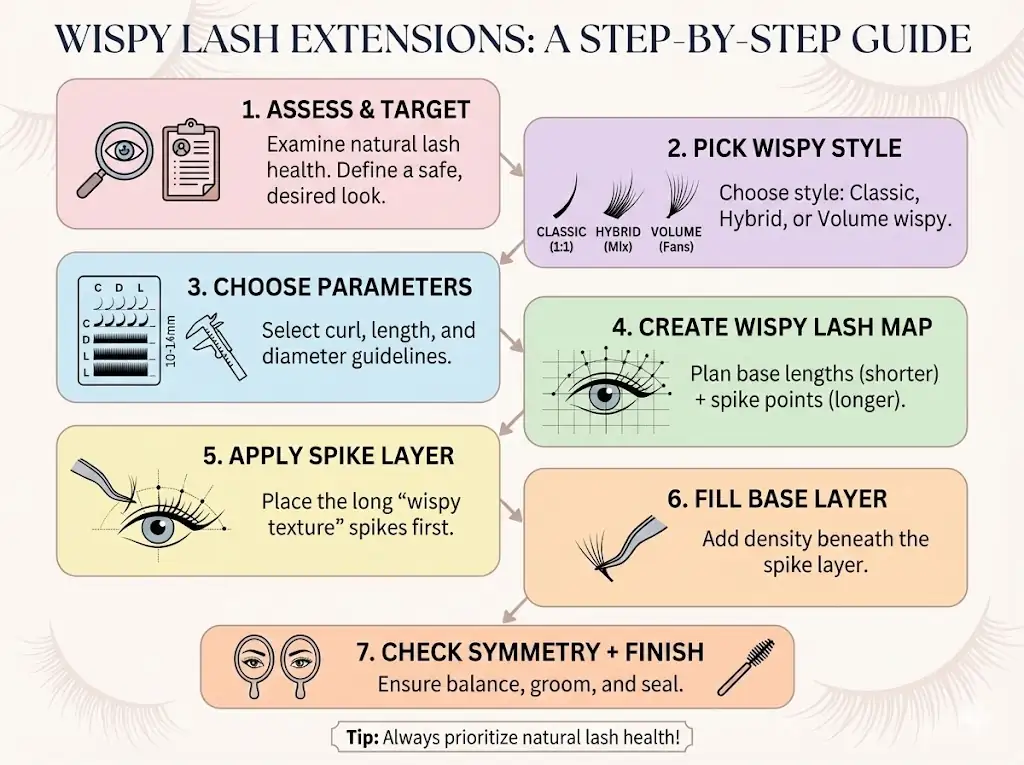
How to do wispy lash extensions (Step-by-step)
Wispy sets are built in two layers: a spike layer (texture) + a base layer (fullness). The key is a clean wispy lash map and consistent spike placement so the set looks airy—not messy.
Step 1: Assess natural lashes + choose a safe target look
- natural lash density (sparse/medium/full)
- lash health (fine/strong)
- growth direction (straight/downward/crossing)
- lifestyle (oily skincare, eye rubbing, athlete, etc.)
Rule of thumb: If natural lashes are fine/weak, reduce length and density first, not just curl. Wispy can still look textured with lighter fibers and fewer spikes.
Step 2: Pick your wispy style (Classic vs Hybrid vs Volume)
- Wispy Classic: best for natural, airy sets; spikes made with single extensions
- Wispy Hybrid: best “middle ground”; spikes = singles, base = mix of singles + fans
- Wispy Volume: bold + fluffy; spikes often made with closed fans + base layer fans
If the client says “I want texture but not too heavy,” start with wispy hybrid.
Step 3: Choose lengths, curl, and diameter (simple guidelines)
| Layer | What it does | Typical length range | Curl ideas | Safer fiber options |
|---|---|---|---|---|
| Base layer | fullness + coverage | ~7–14mm (match client) | C / CC / D (based on natural lash direction) | lighter diameters, soft fans |
| Spike layer | texture + “wispy” | +2–3mm longer than base | same curl or 1 level higher if needed | single spikes or closed fans |
Step 4: Create your wispy lash map (base lengths + spike plan)
- Decide your base map first (inner → outer lengths)
- Plan 7–10 spikes per eye (adjust by eye width + drama level)
- Keep spikes evenly spaced (avoid clumping spikes together)
- Inner corner spikes should be shorter and softer for comfort and retention
Example: Natural wispy map
Base: 8–9–10–11–12 (inner → outer)
Spikes: 10–11–12–13–14 placed at consistent intervals (+2mm over base)
Step 5: Apply the spike layer (the “wispy texture”)
Spike rules
- Spikes should be 2–3mm longer than the base layer
- Place spikes on strong lashes (avoid the weakest baby lashes)
- Keep direction consistent so spikes don’t twist or cross
Method A: Single-lash spikes (Classic + Hybrid)
- Use 1–2 single extensions to form a spike (safer redundancy if one sheds)
- Pinch alignment so the spike stays narrow and defined
Method B: Closed-fan spikes (Volume wispy / wet-look styles)
- Use narrow/closed fans to create “sharper” spikes
- Keep spikes slim; wide fans make spikes look fluffy, not spiky
Step 6: Fill the base layer (under spikes)
Your goal is even coverage without hiding spikes.
Wispy Classic base
- Fill remaining lashes with singles following the base map
- Keep base slightly shorter so spikes remain visible
Wispy Hybrid base
- Place fans between spikes for fullness
- Use singles where needed for clean transitions
Wispy Volume base
- Use fans across the lash line for fluffy density
- Keep your map clean—volume can look “messy” if lengths jump randomly
Texture rule: If spikes disappear, your base layer is too long or too dense. Shorten the base or reduce fan density.
Step 7: Check symmetry + finish
- Brush both eyes and compare spike rhythm (left vs right)
- Look for heavy spots: remove/replace any spike that tilts or crosses
- Ensure inner corners are neat and not too long
- Final brush + client mirror check
Quick aftercare instructions to tell clients (30 seconds)
- Avoid oil-based products around the lash line
- Cleanse lashes regularly with a gentle cleanser
- Don’t rub or pull; brush when dry
- Book fills every 2–3 weeks for best shape
Optional: If you prefer premade spikes to save time, you can explore spike lashes and wispy-friendly fans in our shop.
How long do wispy lash extensions last?
Quick answer: Most clients need a fill every 2–3 weeks, and the full set sheds out within 4–6 weeks.
Wispy lash extensions typically look their best for about 2–3 weeks before most clients need a fill. The exact timing depends on natural lash shedding, aftercare, and how the set was applied.
Over time, lash extensions fall out gradually as your natural lashes shed. For many clients, the set will be mostly gone by 4–6 weeks, which is why regular fills help maintain the wispy texture and keep spikes looking intentional.
What affects how long they last:
- Natural lash cycle: faster shedding = fills needed sooner
- Aftercare: oil-based products, rubbing, or skipping cleansing reduces retention
- Application quality: isolation, bonding, and weight matching matter
- Lifestyle: humidity, sweating, and sleeping habits can impact hold
If your client wants the wispy look to stay airy and spiky (not messy), recommend booking fills every 2–3 weeks and following the care tips below.
Care for wispy lash extensions (aftercare + cleaning routine)
Wispy lash extensions stay fluffy and textured when clients follow a simple routine. Aftercare matters as much as the application—especially for keeping spikes from clumping and improving retention.
First 24–48 hours (important):
- Keep lashes dry (no steam, hot showers, or swimming) unless your adhesive brand specifically states otherwise.
- Avoid heavy eye makeup and do not use oil-based products around the lash line.
Daily care (best practice):
- Clean lashes once per day using a lash-safe cleanser or a gentle, oil-free foaming cleanser.
- Wet the lashes lightly, apply cleanser with clean fingertips or a soft brush, rinse thoroughly, and pat dry.
- Brush gently with a clean spoolie after drying to separate spikes and keep the wispy texture.
What to avoid (common retention killers):
- Oil-based makeup removers, cleansing balms, or creamy eye products near the lash line
- Rubbing/pulling the lashes or using cotton pads directly on extensions
- Mascara on extensions (especially waterproof mascara), unless your lash tech approves it
- Sleeping face-down or pressing lashes into a pillow
Client maintenance schedule:
- Recommend fills every 2–3 weeks to keep the wispy map looking even and prevent gaps.
- If many spikes are missing or the set looks uneven, it’s often better to remove and reapply rather than overfilling.
Comfort & safety notes (keep it professional):
Always use clean tools and spoolies; do not share brushes between clients.
Mild itchiness right after application can happen, but pain, swelling, or persistent redness is not normal—clients should contact their lash artist and seek medical advice if symptoms are severe.
Quick aftercare FAQ
- Can I wash my lash extensions? Yes—cleaning helps retention. Use an oil-free cleanser and be gentle.
- Why do my wispy spikes clump? Usually from oil, makeup residue, or not brushing after drying.
- Can I use eyeliner? Yes, but choose oil-free formulas and avoid tightlining on the waterline if it causes buildup.
Takeaway
Wispy lash extensions create a textured, airy finish by combining a base layer with strategically placed spikes. The look is flexible—small mapping changes can make it softer, bolder, or better suited to different eye shapes.
If you’re a lash artist, here’s what to focus on for consistent results:
- Keep spikes 2–3 mm longer than the base layer
- Use 7–10 spikes per eye and space them evenly
- Match curl and weight to the client’s natural lash strength
- Place the base layer slightly lower than the spikes to preserve texture
- Recommend gentle cleansing + no oil-based products for better retention
If you’re looking for products to create wispy sets (spikes, classic lashes, and volume fans), you can browse our lash extensions collection or get a quote.